
Introduction
The Meetings module in VOLUM3 streamlines project communication by efficiently organizing, tracking, and managing meetings. It enables quick scheduling, agenda creation, and minute-taking while keeping all project information centralized.
Key features include:
- Inline Editing – All meeting items are directly editable on-screen, ensuring speed and convenience.
- Task Management – Tasks and action items can be assigned and tracked directly, ensuring accountability.
- Seamless Integration – The module connects with existing project data, reducing redundancy and saving time.
- Notification System – Participants receive timely notifications about meetings, updates, and review deadlines.
- Email Attachments – Meeting agendas and minutes are automatically sent as PDF attachments via email to relevant users.
With everything in one place, teams stay aligned and informed throughout the project lifecycle.
Accessing the Meetings Module
To access the Meetings module:
- Navigate to Meetings in the main navigation menu.
- Click on the Meetings icon to open the module.
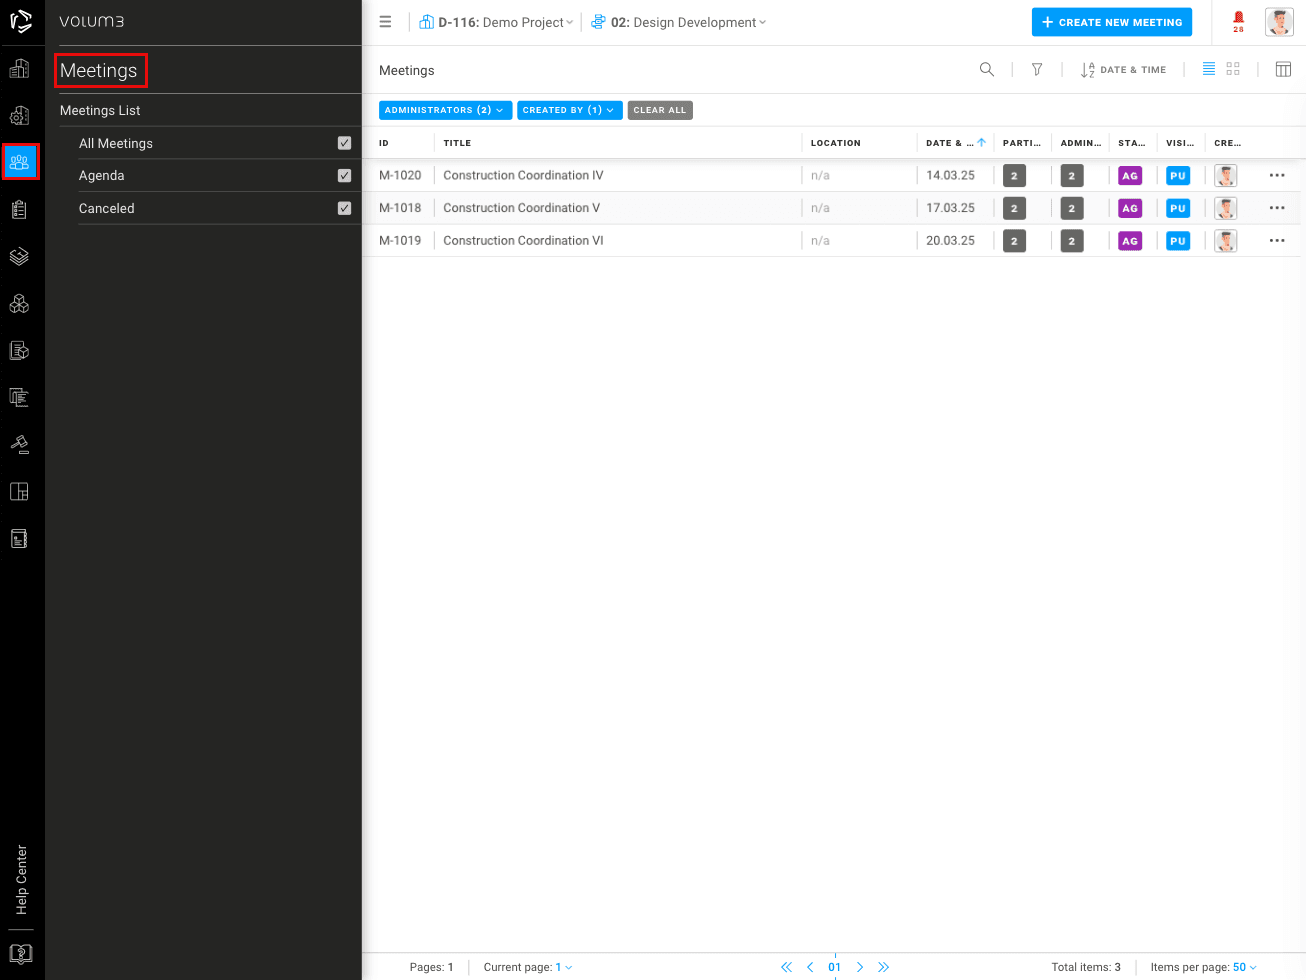
Screen Overview
The Meetings module consists of:
- Meeting List – A list of all created meetings.
- Filters and Search Bar – Allows you to refine and search for specific meetings.
- Meeting Actions – Options to create, edit, delete, and manage meetings.
- Meeting Details – Displays the selected meeting with its agenda, participants, and tasks.
- Navigation panel - Displays the types of meetings
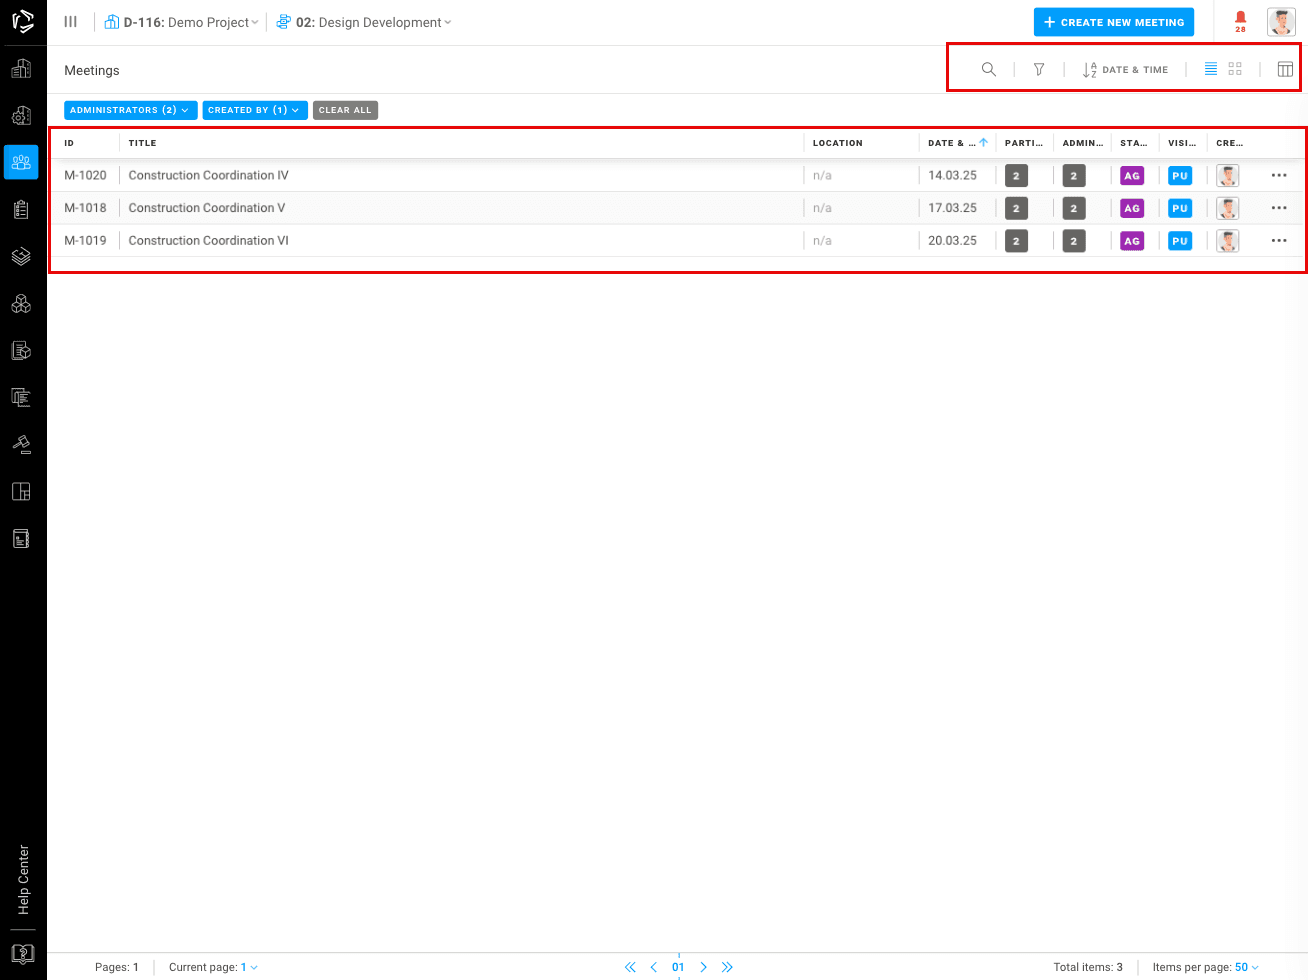
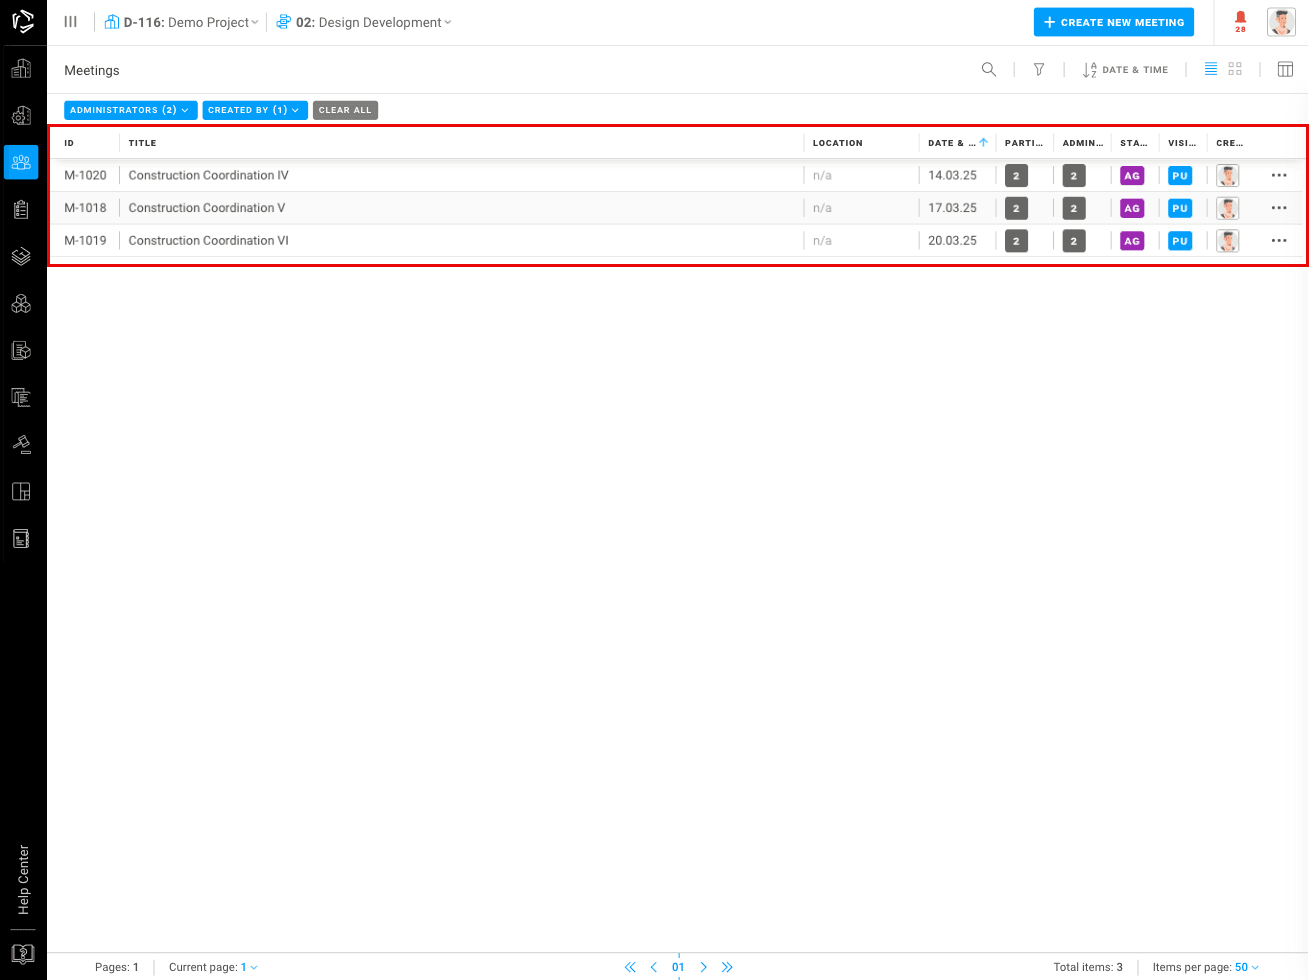
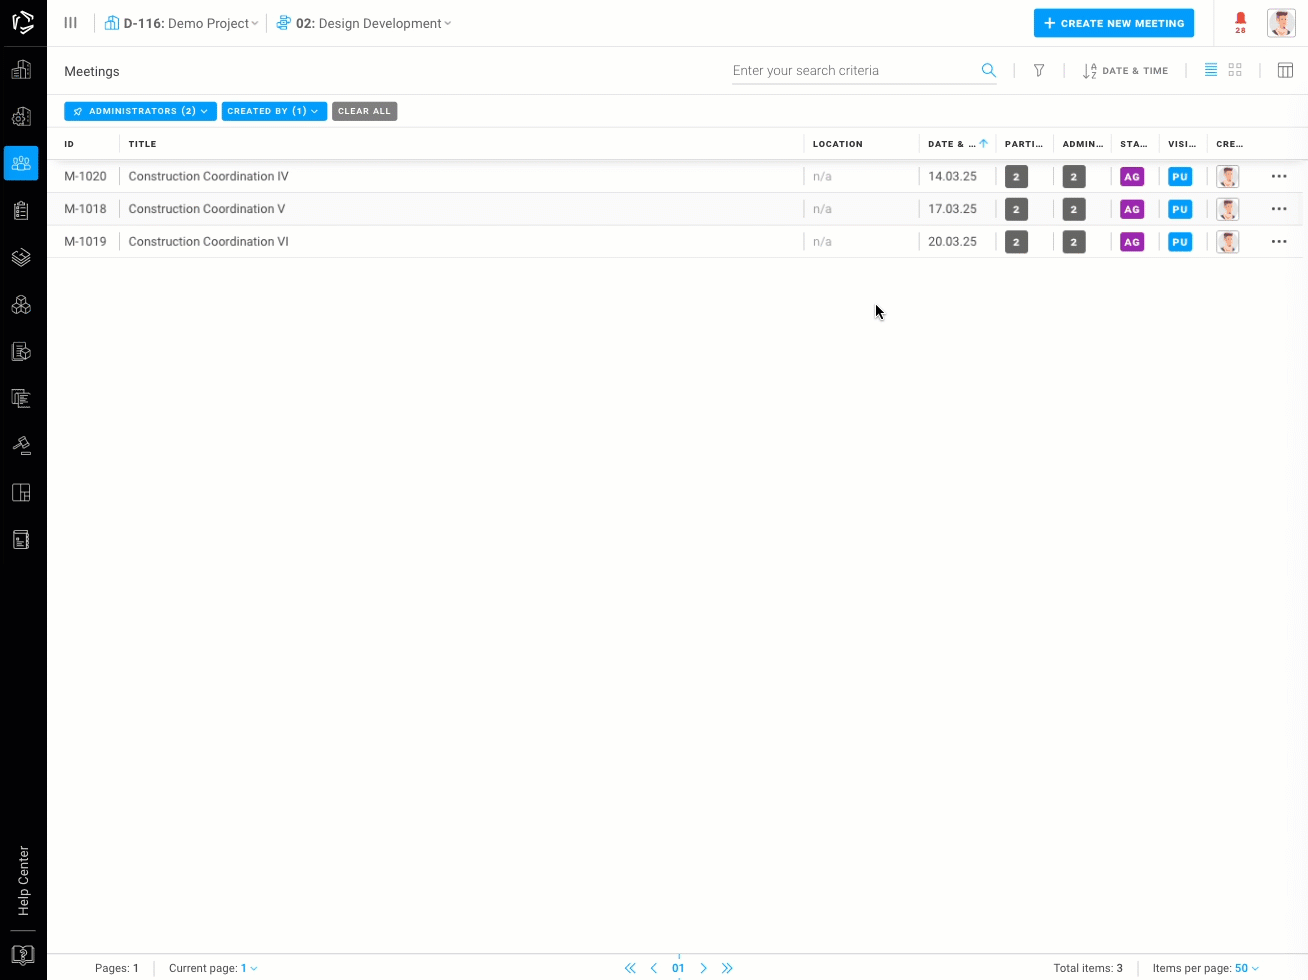
Meeting List
The Meeting List displays all meetings created within a project. Each meeting entry includes:
- Meeting ID
- Meeting Title
- Location
- Date and Time
- Participants, Administrators
- Status (Agenda, Minutes, Review, Closed)
- Visibility (Public, Private)
- Actions Menu (Follow up,, Send, Print, Properties)
Filters
To refine the meeting list, use the Filters option:
- Visibility (Public, Private)
- Meeting Date
- Administrators
- Participants
- Followers
- Created By
- Tag
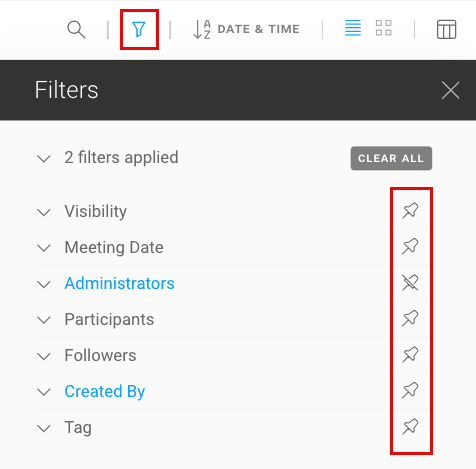
Note: filter for status can be found in the left navigation panel
Search
You can quickly find meetings using the Search Bar at the top of the screen by entering keywords related to the meeting name, participants, or agenda.
Opening the Meeting
From the meeting list you can click existing meeting to open it.
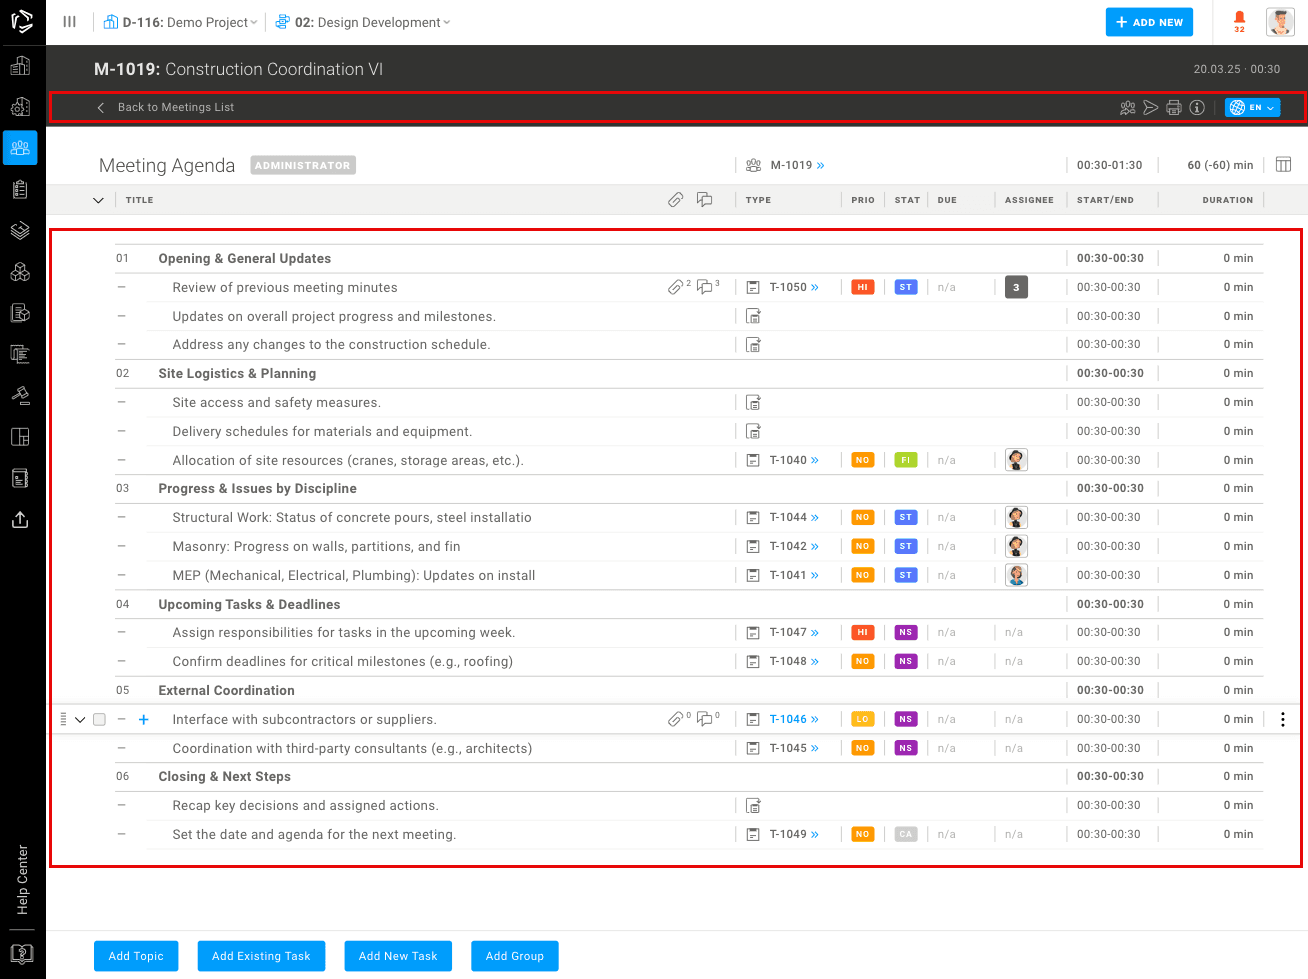
The left navigation panel automatically closes when you enter a meeting from the Meeting List, providing more screen space for the meeting content.

To reopen the left navigation panel, click the ≡ hamburger icon.
To exit the meeting and return to the Meeting List, click the "Back to Meeting List" button located at the top left of the meeting toolbar.
Creating a Meeting
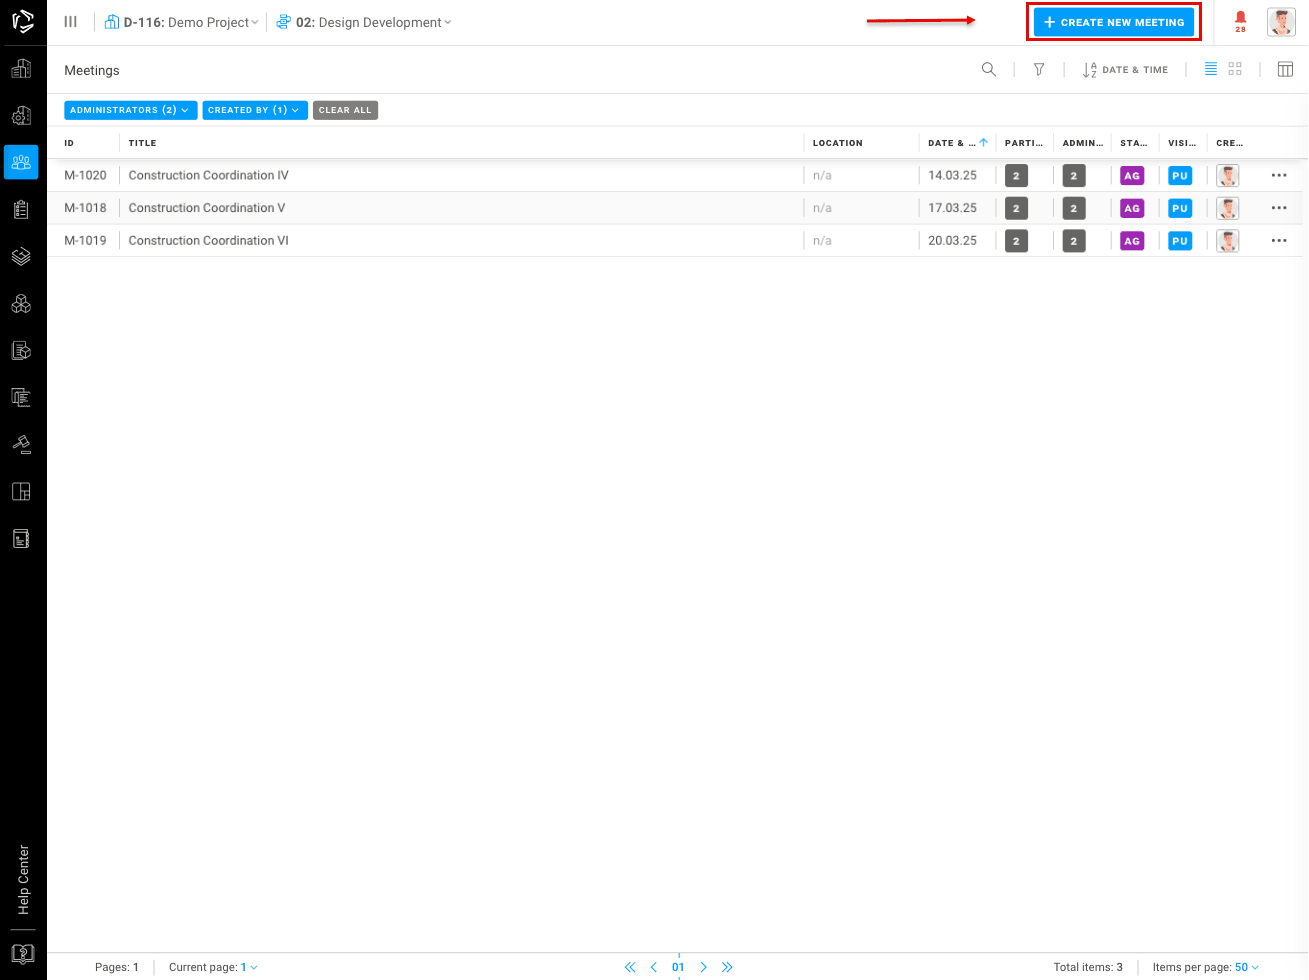
To create a new meeting:
- Navigate to the Meetings module.
- Click + Create New Meeting.
- Set the meeting name, date, time, and duration.
- Select languages to be used during the meeting.
- Choose participants from your company members.
- Click Create to save the meeting.
The newly created meeting will appear in the Meetings List.

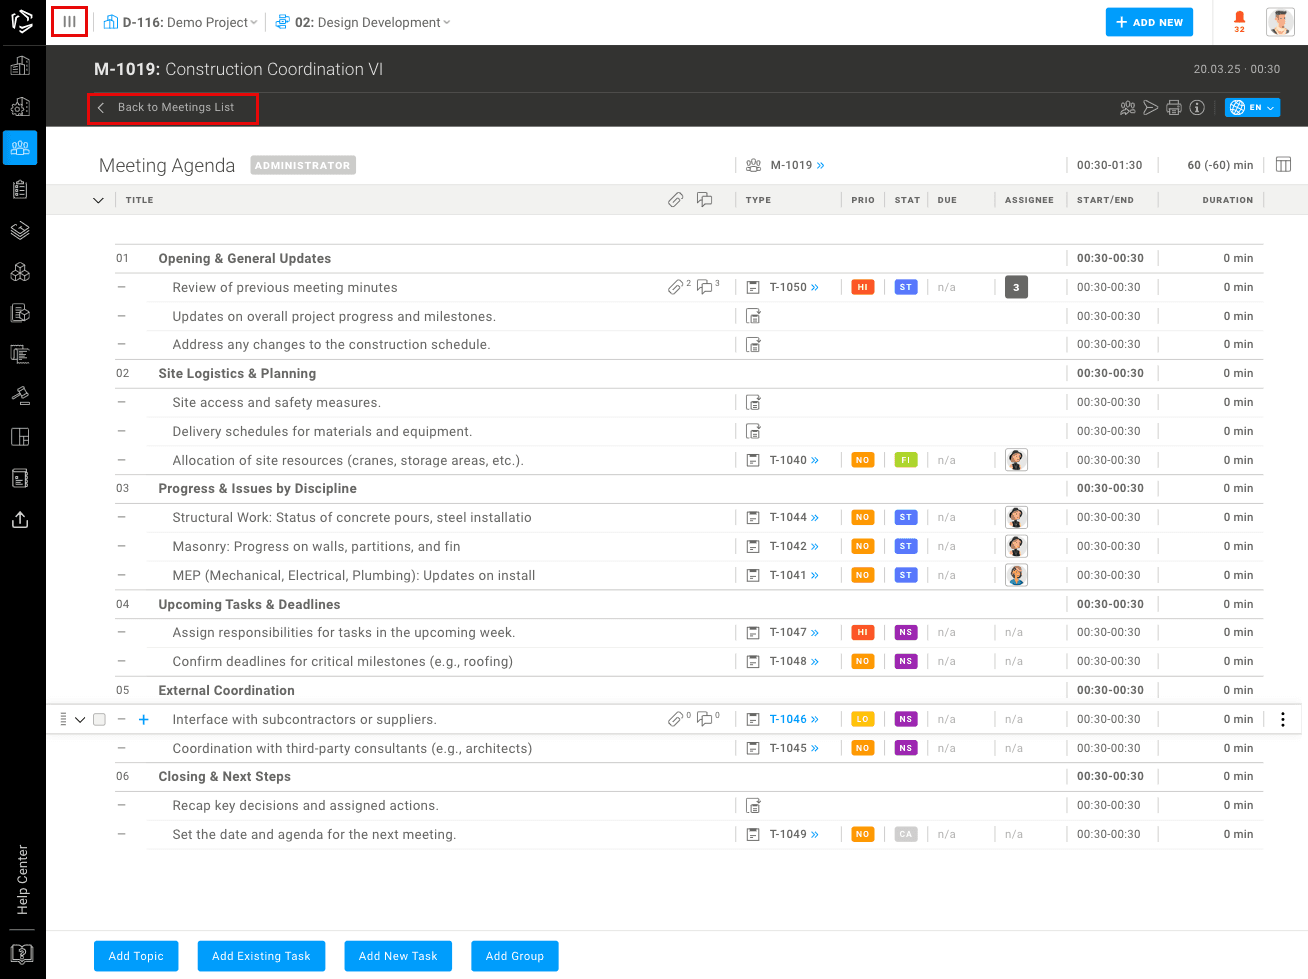
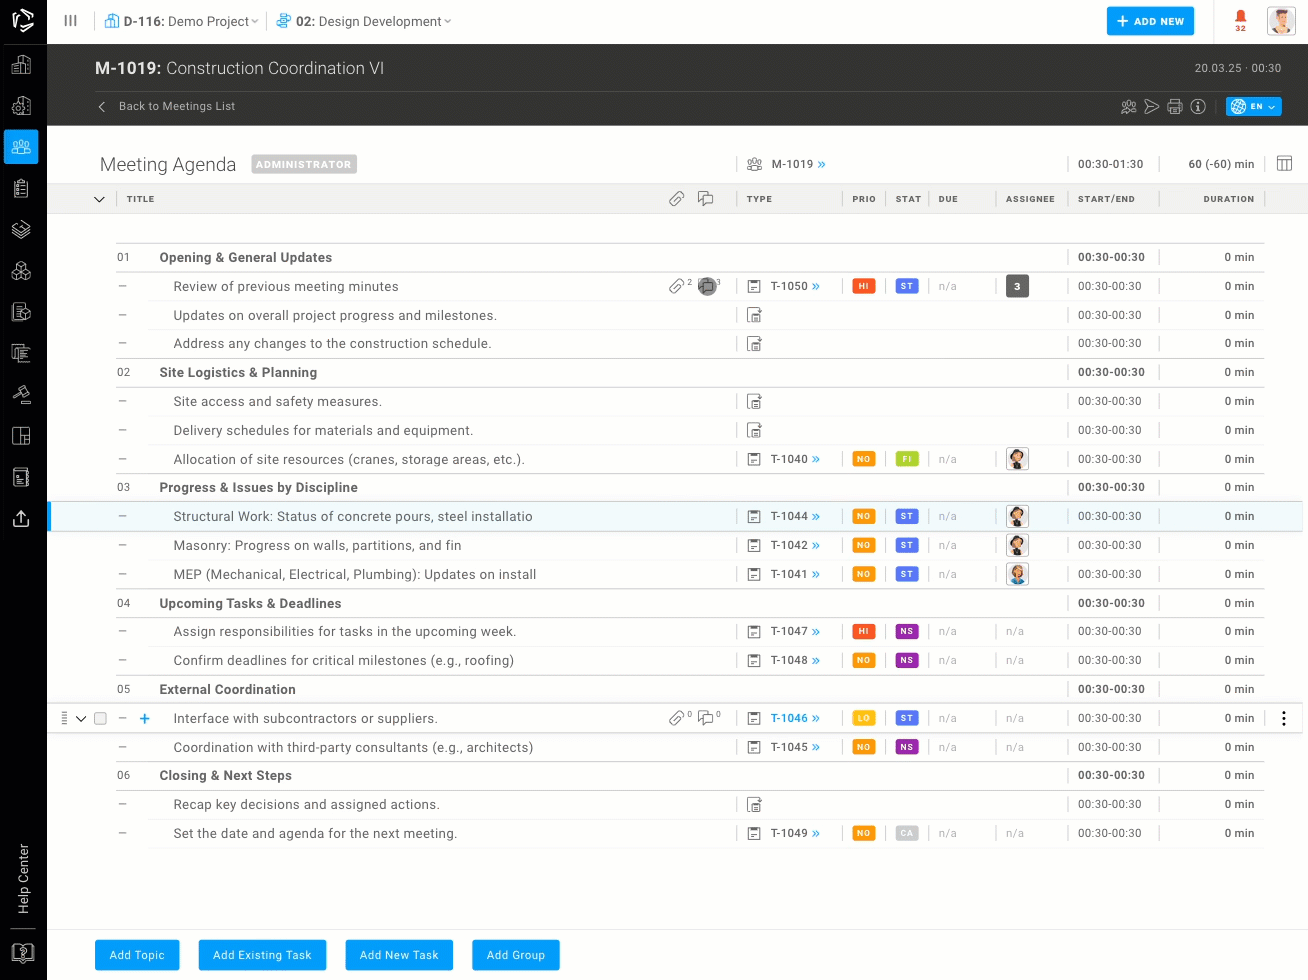
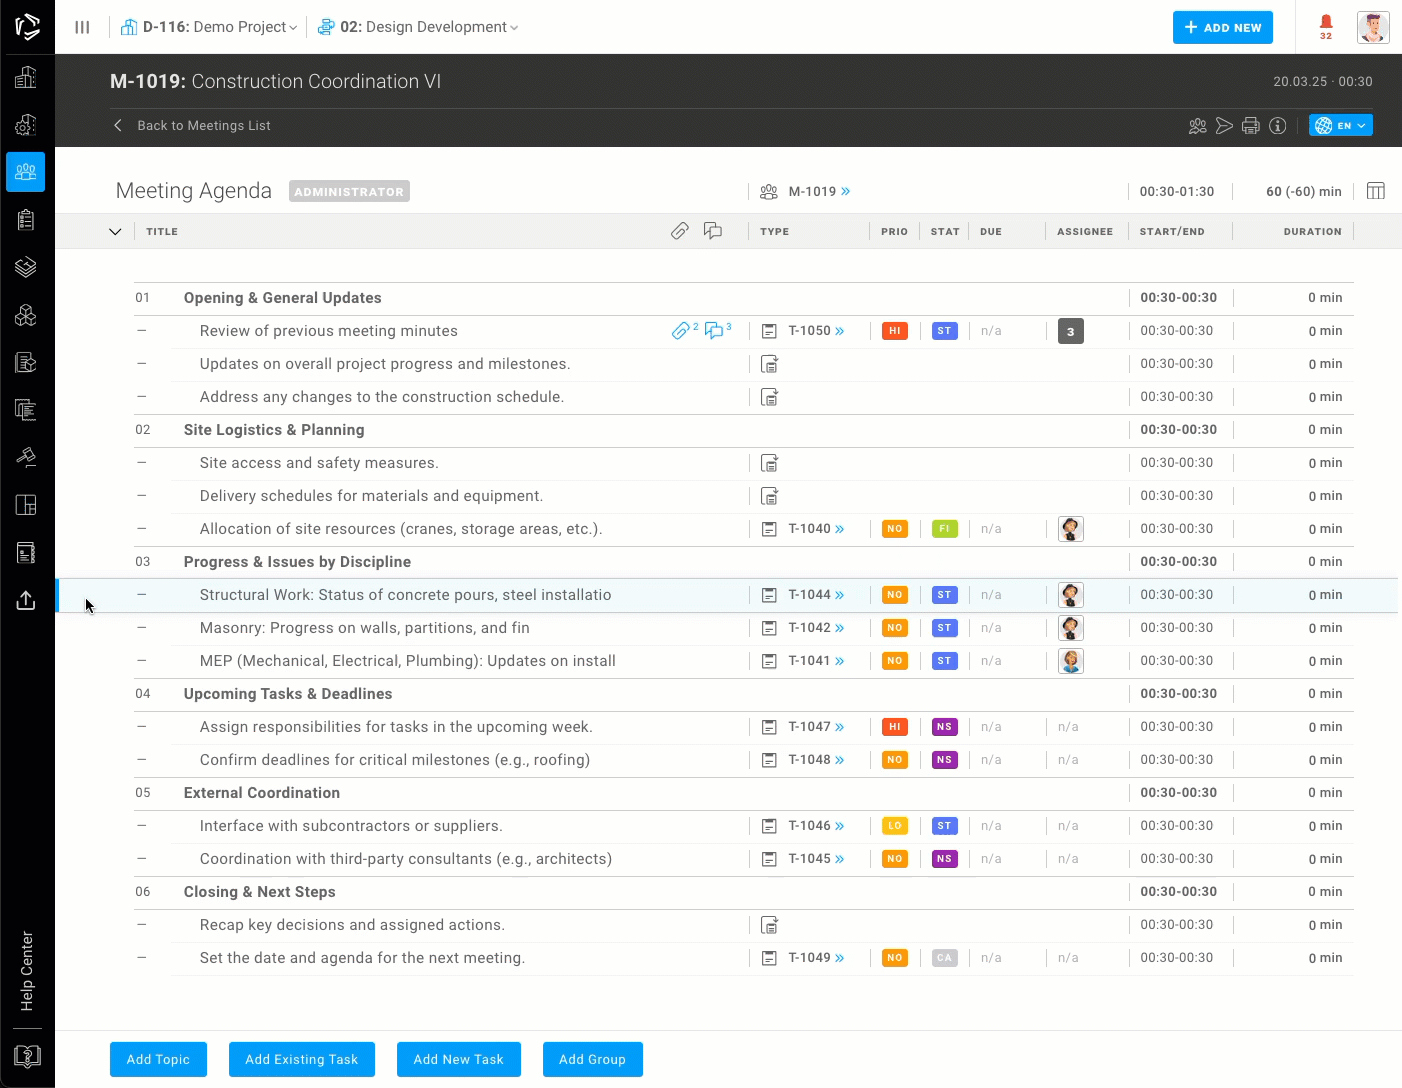
Meeting Screen Overview
The main meeting screen is divided into several key areas:
- Toolbar – Located at the top, it provides navigation, meeting status, actions and a language switcher.
- Meeting Items Area – The central section where the meeting agenda and minutes are edited.
- Flyout – A properties window that appears on the right side, displaying meeting details and settings.
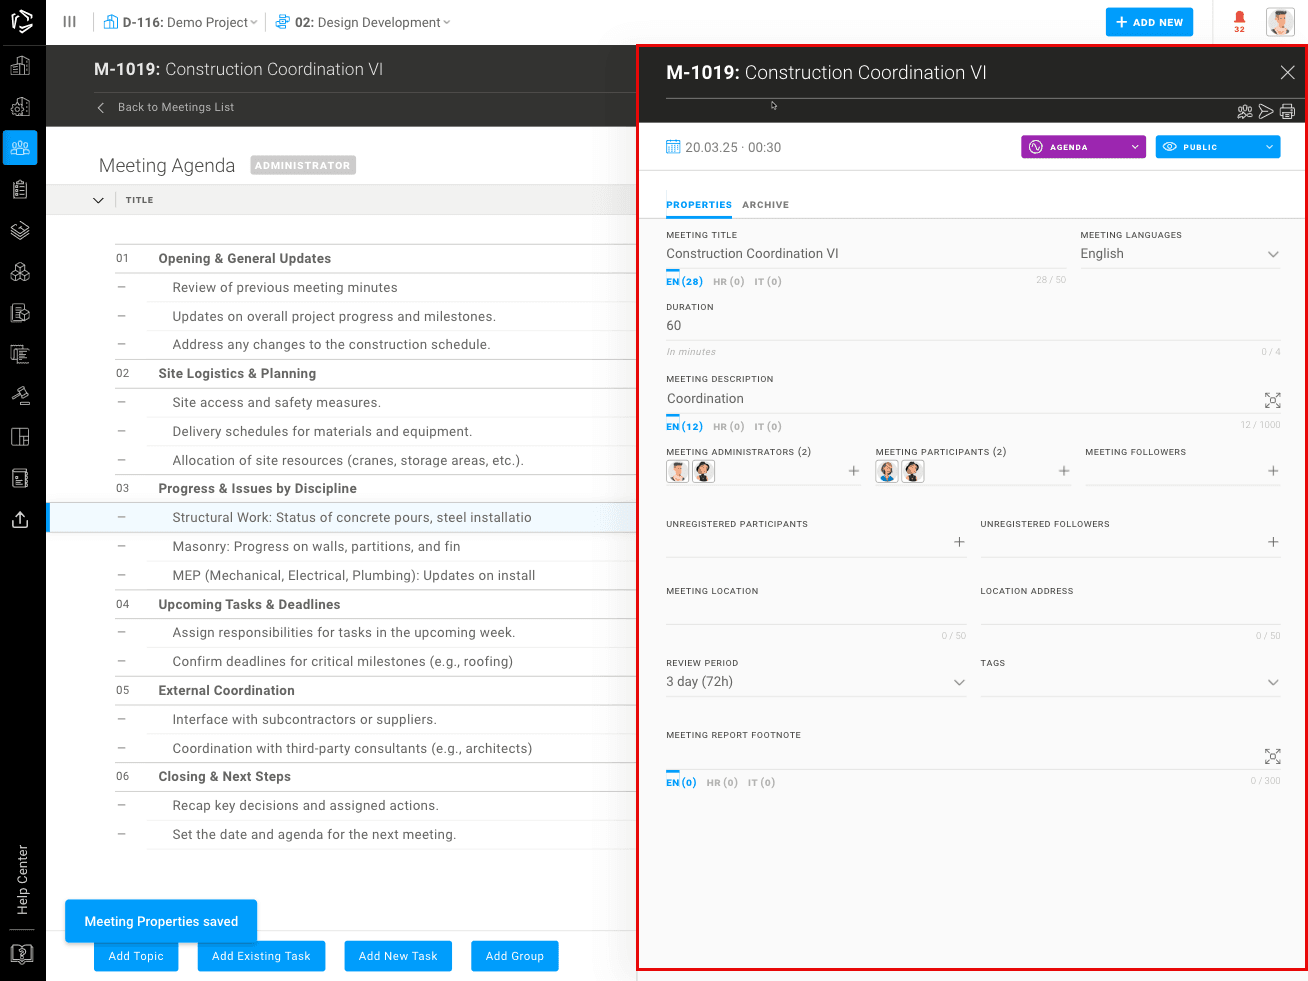
Meeting Flyout Window
Clicking on a meeting ID opens the flyout window, where you can:
- Edit meeting details (date, time, location, participants, etc.)
- Add topics and tasks
- Attach files and comments
- Update the meeting status

Meeting Status
A meeting in VOLUM3 can have different statuses:
- Agenda – The initial state where the agenda is being prepared.
- Minutes – The meeting has started, and administrators and participants are recording discussions, conclusions, and actions within tasks and topics.
- Review – A defined period for commenting on meeting minutes before Closing.
- Closed – The meeting is locked, no further changes can be made, and a PDF copy is archived.
- Canceled – The meeting has been canceled and will not proceed.
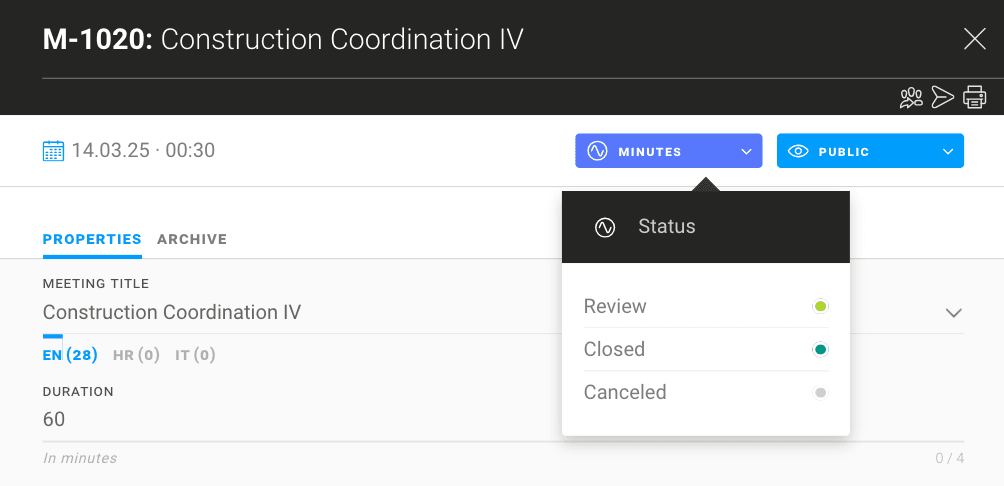
Note: Changing statuses from review to closed will automatically initiate sending PDF by email and notification
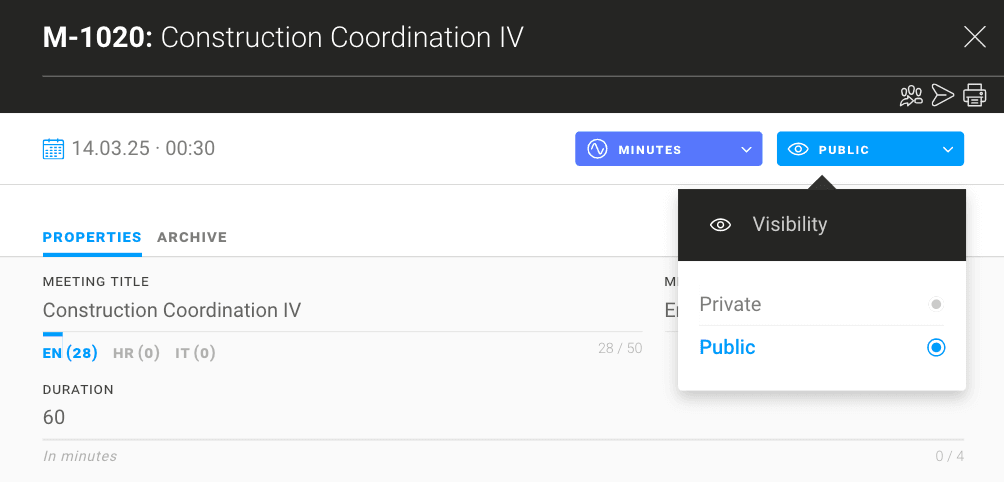
Meeting Visibility
By default, all meetings in VOLUM3 are set to public, meaning all users can view them.
If the meeting contains sensitive information, you can set it to private:
- Change its status to Private, ensuring that only added participants (Administrators, Participants, and Followers) can view the meeting.
- Private meetings restrict access to only those explicitly invited and are not visible on the meeting list
🔒 Important:
- All tasks created within a private meeting will be also Private and will be visible on the task list only to the meeting participants. SEE TASK PRIVATE
- Users who are not part of the meeting will not have access to its content.
Meeting Flyout tabs
The Meeting Flyout Window in VOLUM3 has only 2 tabs,
- Properties tab
- Archive tab
Properties Tab
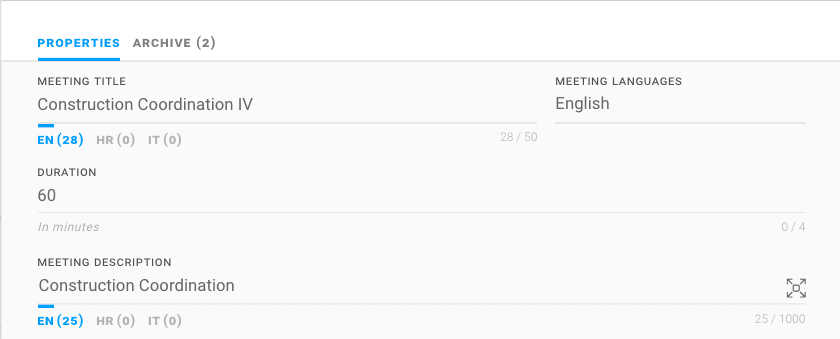
Meeting Language
Meeting agendas and minutes can be written in any of the available languages set for the project (if the project is multilingual).
Meeting Title
The meeting title is used to identify the meeting and is limited to 50 characters.
Meeting Description
The meeting description provides additional context about the meeting, making it easier to understand when receiving the agenda or meeting minutes.
Meeting Duration
Each meeting has a user-defined duration, with a default value of 60 minutes. This helps in planning and managing time effectively during the meeting.
Meeting Roles
In VOLUM3, there are three main roles for users in meetings who can open the meeting and comment on its content:
- Administrators – Can manage the meeting, add participants and followers, edit and sort items on the meeting.
- Participants – Actively take part in the meeting, edit tasks and topics, and comment. They cannot sort or delete items.
- Followers – Do not participate in the meeting but need to stay informed.
Additionally, there are two roles for people who are not registered in VOLUM3 but can receive meeting notifications via email:
- Unregistered Participants – Attend the meeting and receive the agenda and minutes via email.
- Unregistered Followers – Do not attend the meeting but receive the agenda and minutes via email.

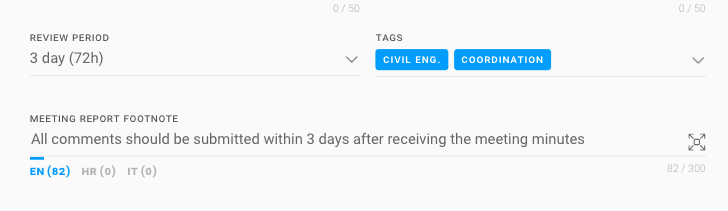
Review Period
By default, the review period is set to 3 days. Once this period expires, all participants will receive a notification.
Meeting Report Footnote
Every meeting exported to PDF will include this footnote. This is typically used to outline terms or notifications, such as a reminder that all comments should be submitted within 3 days after receiving the meeting minutes during the review period.
Tags
Tags help classify meetings and make them easier to find when naming alone is not sufficient. Filtering by tags enables quicker access to specific types of meetings.
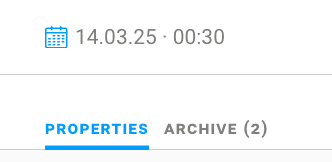
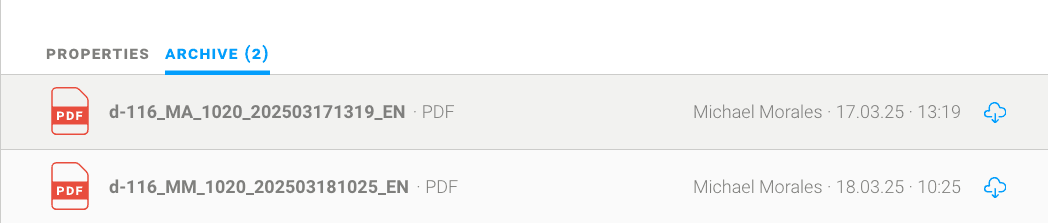
Archive Tab
Once a meeting agenda is converted into a meeting or the meeting is closed, the current status is exported as a PDF and stored for record-keeping and credibility. The name of the administrator who changed the status, along with the date and time, is recorded.
PDF files are named using the project number, followed by:
- MA – Meeting Agenda
- MM – Meeting Minutes
Each file name also includes the date and timestamp for easy reference. You can download these meeting archives at any time
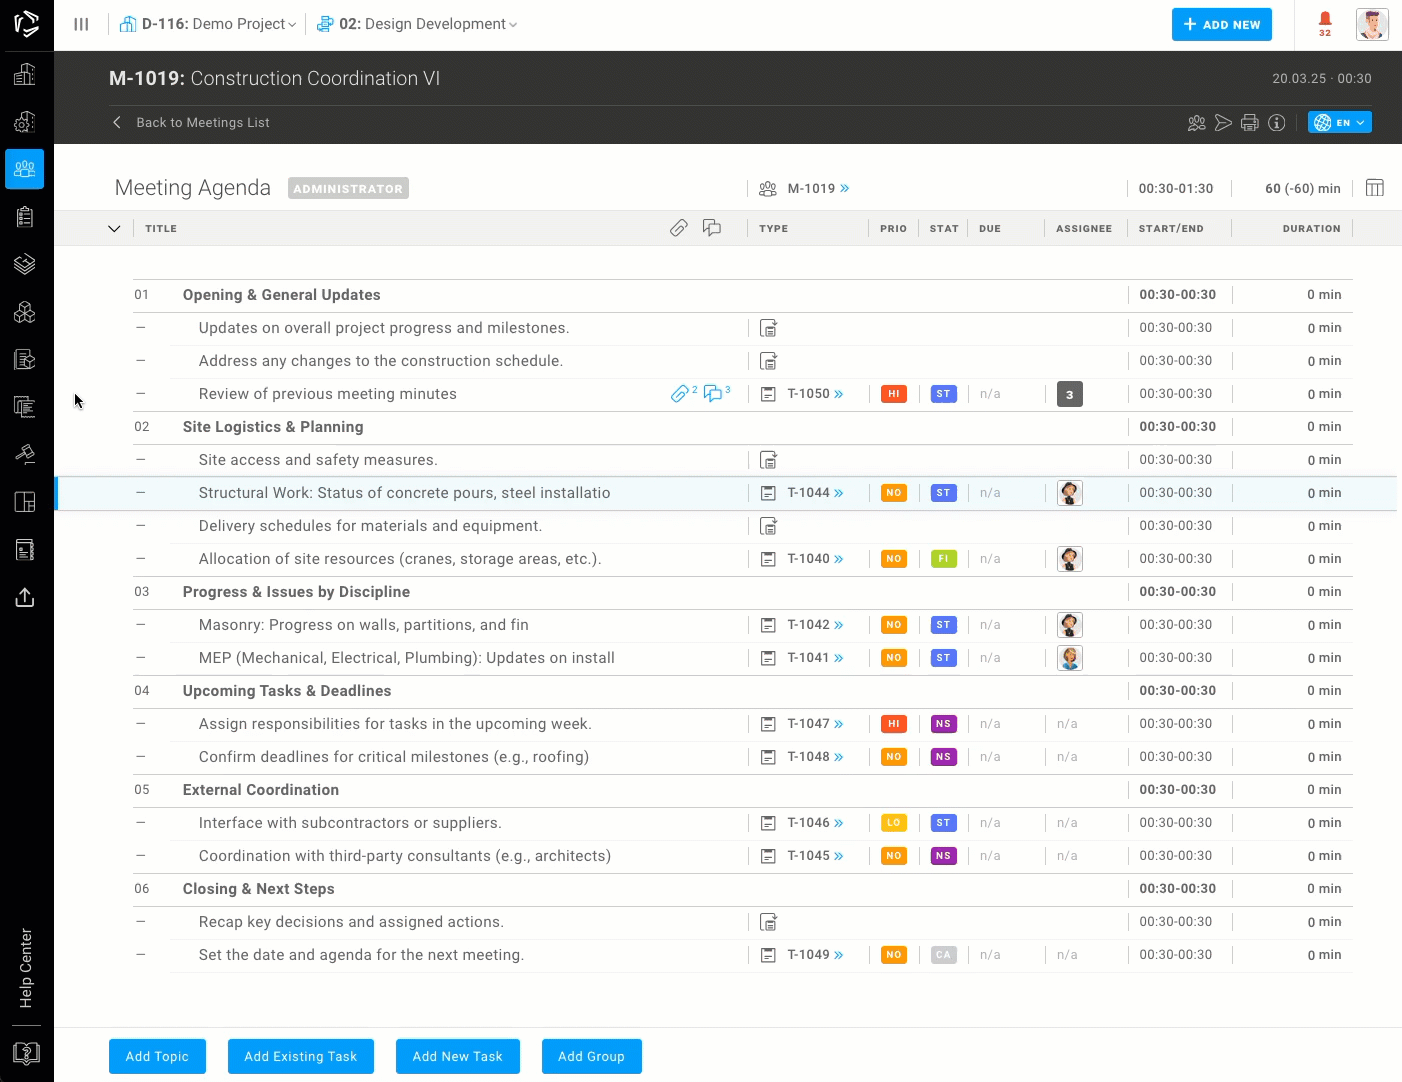
Meeting items
In VOLUM3 meetings, three key elements help structure discussions and actions:
- Groups – Used to organize tasks and topics into logical sections, ensuring a clear and structured meeting flow.
- Tasks – Action items assigned to specific individuals with a due date and an optional priority level, helping track responsibilities and deadlines.
- Topics – Discussion points that can be used to prepare future tasks or document non-critical information relevant to the meeting.

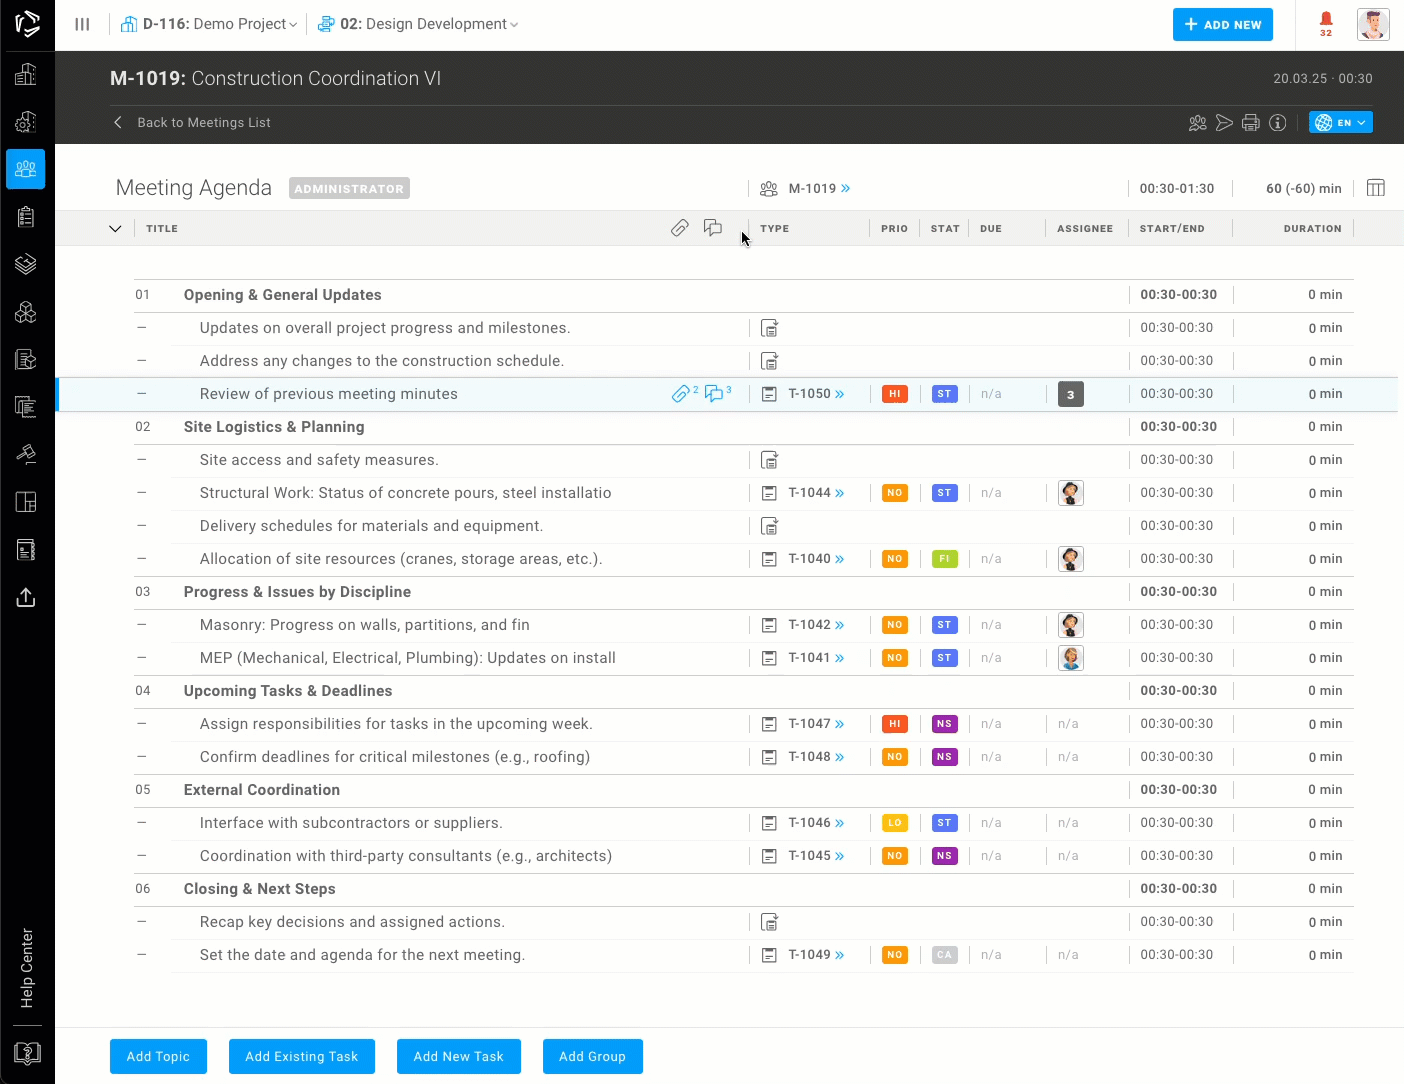
Editing the meeting items
Meeting items in VOLUM3 are directly editable inline, allowing for quick and efficient updates. Additionally, tasks can be edited through the sidebar menu (flyout) for more detailed modifications. Both editing methods are automatically synced.
Inline Editing is Available for:
- Group, task, and topic names
- Task and Topic descriptions
- Task status updates - via dropdown
- Task priority changes - via dropdown
- Commenting
- Adding Files - from local computer
- Adjusting discussion duration in the meeting
Creating and adding meeting items
There are several ways how meeting admins can create or add meeting items:
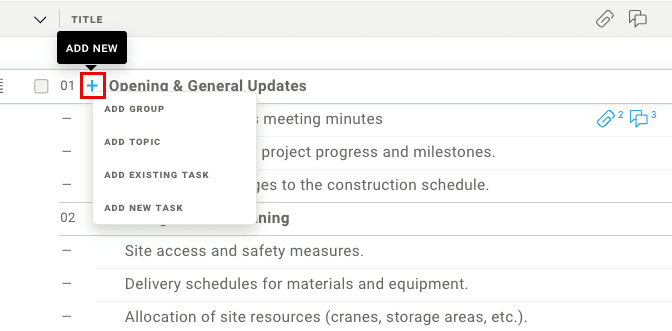
Add button
At the top right of the screen there is a blue “Add” button with 4 options

4 Buttons
Four large buttons are located at the bottom of the screen to allow for quick and easy creation of meeting items.

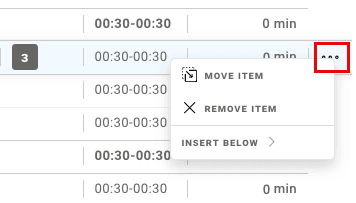
Context Menu
Right-clicking in the Meetings module opens a menu with options to:
- Move items
- Remove items
- Insert below:
- group,
- topic,
- existing task
- new task)
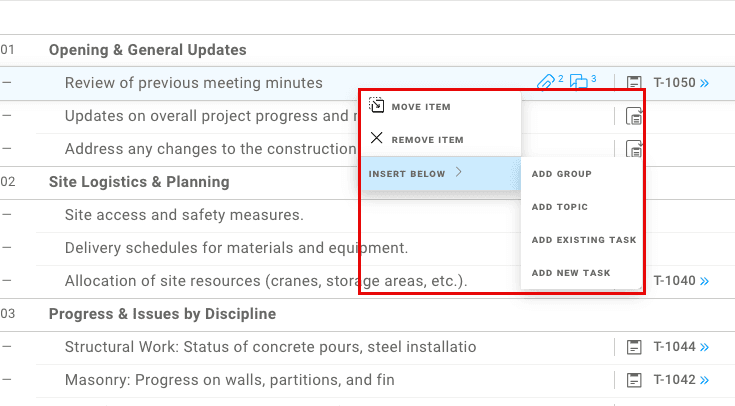
Three-dot menu
The three dot menu on the right side of each row provides the same functionality.
Quick Insert with “+” Button
A "+" button allows quick insertion of row below of:
- Group
- Topic
- Existing Task
- New Task
Reordering Items
To reorder groups, tasks, and topics in your meeting, simply click and drag the three-line icon located on the left side of each row.
Expanding and Collapsing individual Task and Topics
Click the ˅ down arrow icon on the left side of the screen to expand or ˄ up arrow to collapse a specific task or topic.
Expanding reveals the full description.
Expanding and Collapsing All Tasks and Topics
To expand or collapse all tasks and topics at once, use the ˅˄ expand/collapse button in the meeting toolbar.

Toggling Files and Comments
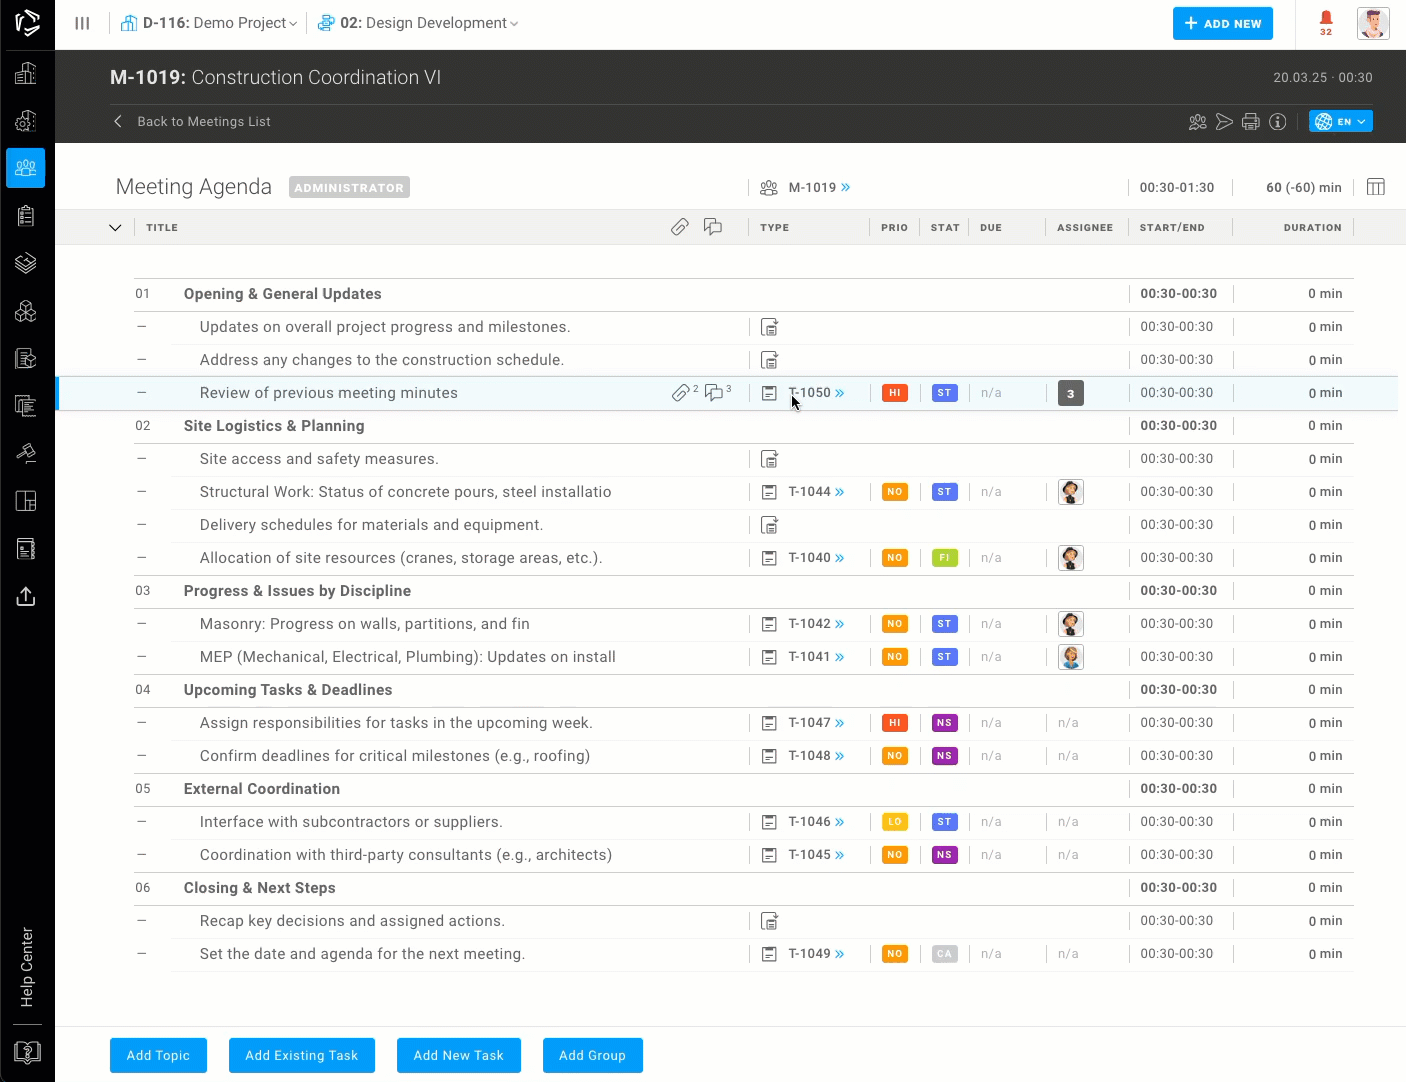
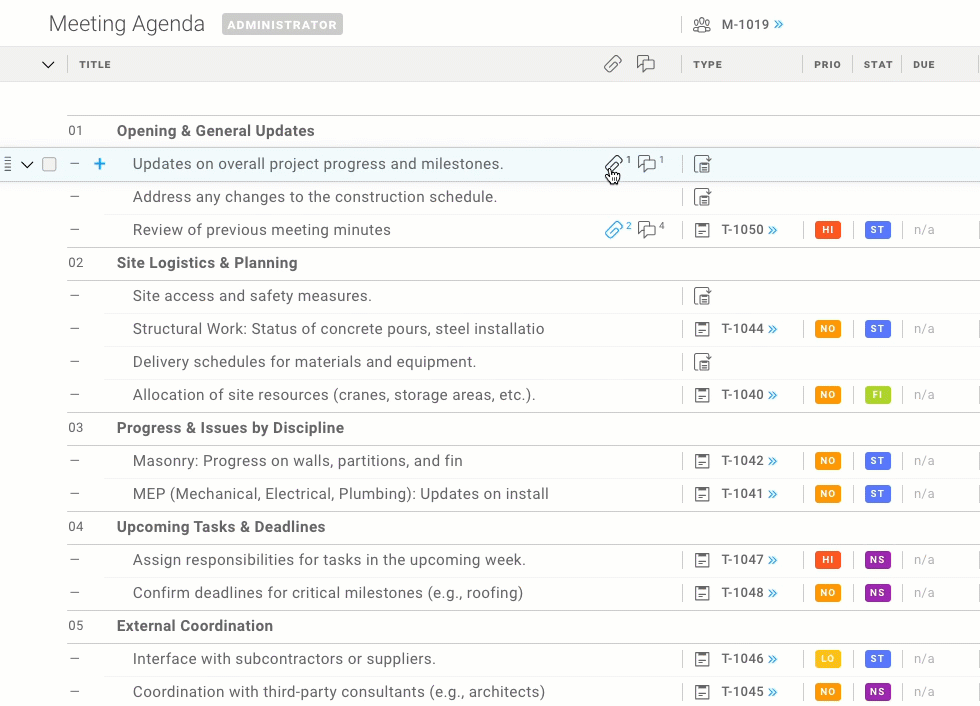
To show or hide comments or attached files for each task or topic, click the comment or file icon in the corresponding row:
- If there are no comments or files attached, the toggle icons will be hidden.
- If comments or files are attached, the icons will display a number indicating the total count of comments or files.

To show or hide all files and comments in the meeting at once, click the comment or file icon in the meeting toolbar.
Commenting on Tasks and Topics
You can add comments to any task or topic, facilitating discussions and updates.
Comments can be entered directly on the meeting or on the task flyout (sidebar window)
Adding Files to Tasks and Topics
Files can be attached to tasks and topics, and attachments can be deleted directly from a topic when no longer needed. You can paste images directly in the task or topic description (CTRL + V)
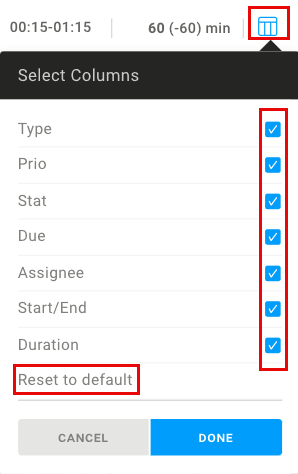
Show / Hide columns
On the meeting user can show or hide columns.
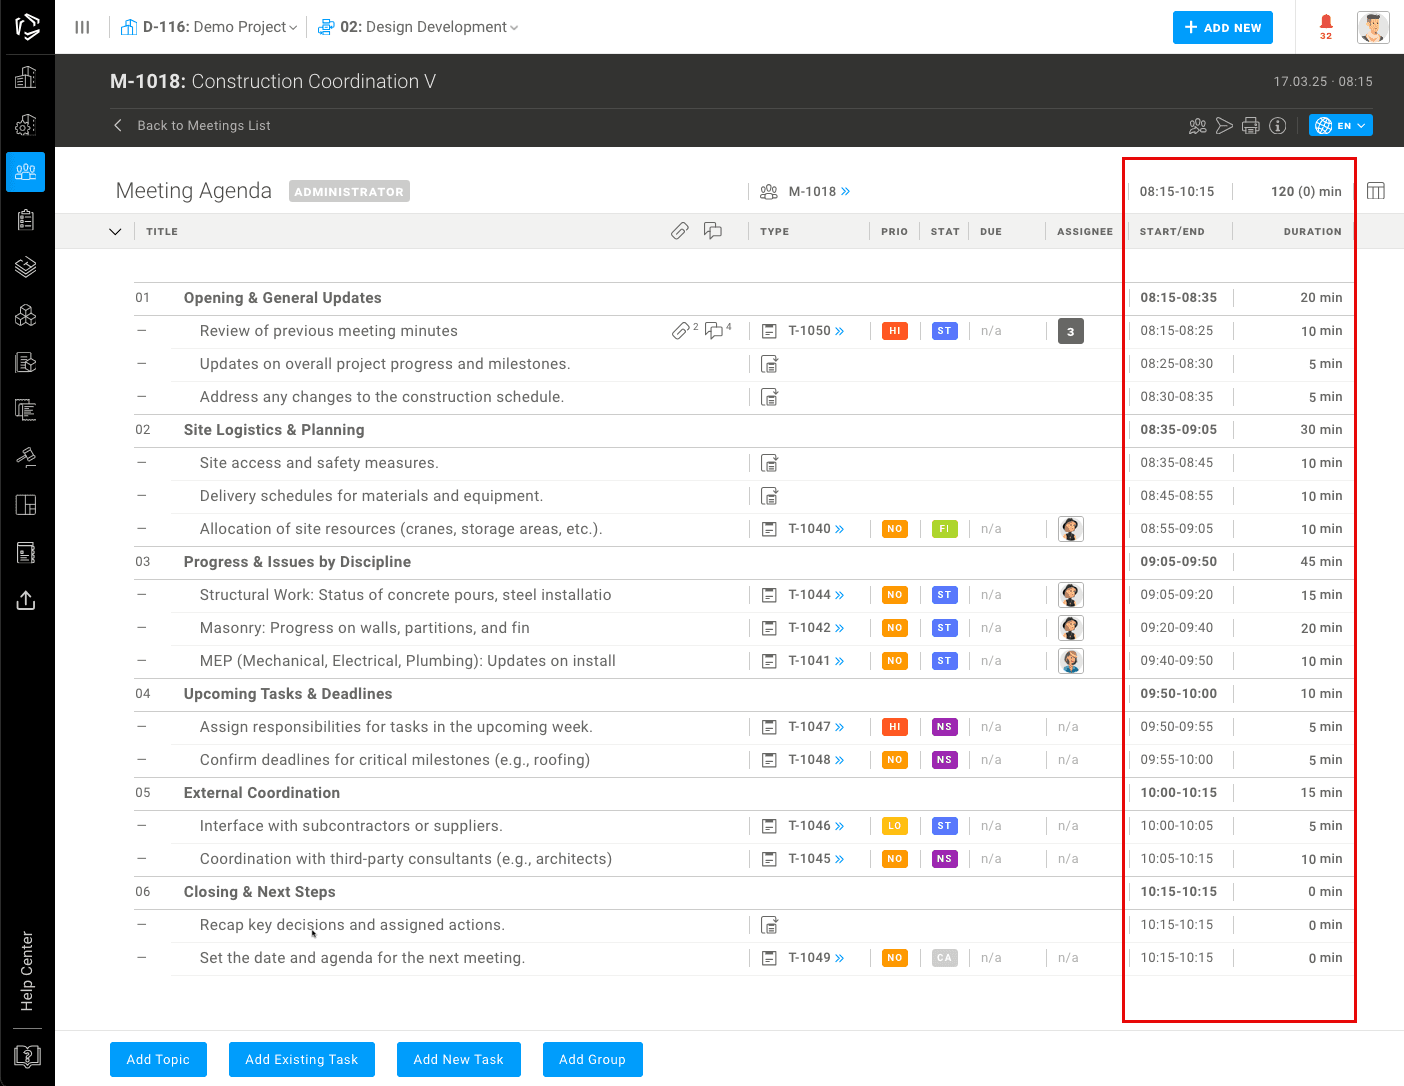
Meeting Duration
The duration of each meeting item is essential for an effective and well-structured meeting. To assist in meeting organization, VOLUM3 allows each task or topic to have a set duration on the meeting.
The start and end times are automatically calculated, providing a tool to manage meeting flow and stay on schedule.
- Groups automatically sum up the duration of all tasks and topics within them.
- The total meeting time is displayed in the toolbar, showing any variation from the pre-set meeting duration defined in the flyout menu.
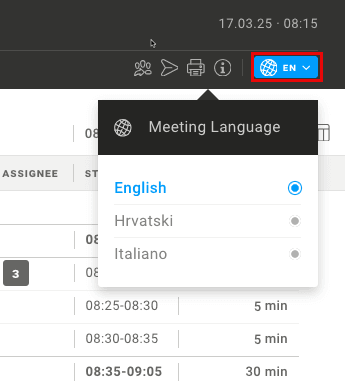
Language switcher
If meeting minutes need to be written in multiple languages VOLUM3 has a solution, administrators can enable additional languages either when creating the meeting or later in the flyout panel. The available languages are those defined in Project Settings.
Users can easily switch languages at any time by selecting the desired language from the dropdown menu located in the top-right toolbar.
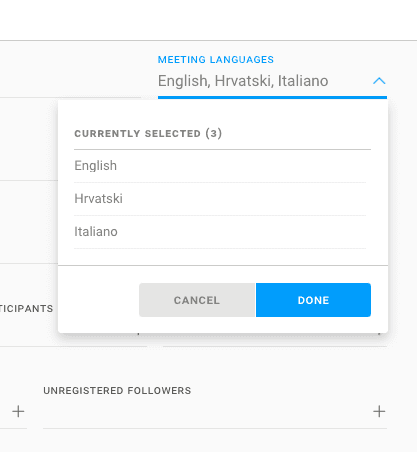
Note: Task and topic descriptions are recorded in each selected language, ensuring multilingual support for meeting details. However, titles are only written in the main project language and remain consistent across all language versions.
Actions
Individual Actions
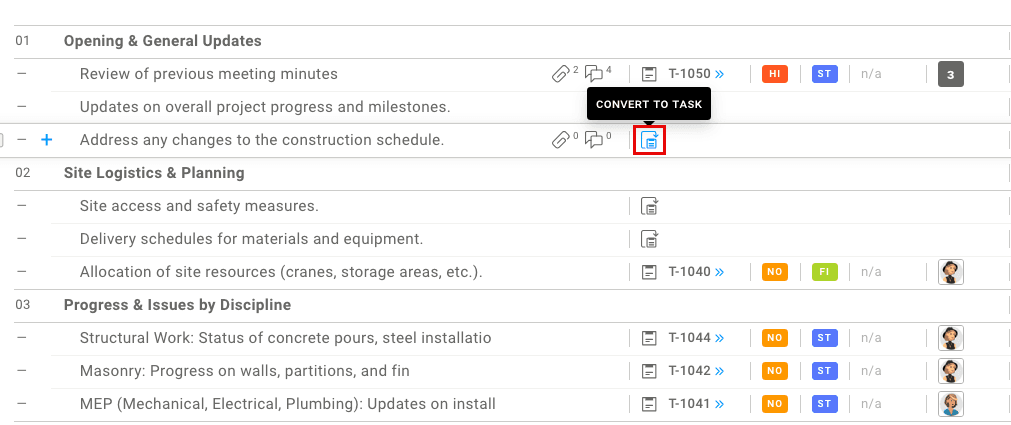
Converting a Topic to a Task
Any topic in a meeting can be converted into a task. Clicking the convert icon will open a window to complete the conversion process.
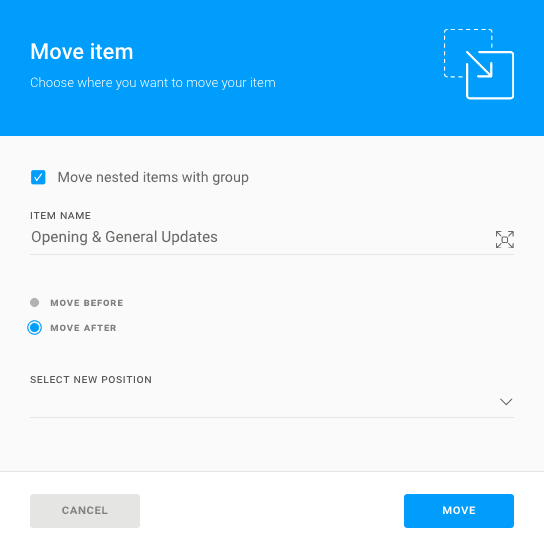
Move
You can move Group, Task or Topic. If the group is moved it
The Move action now moves an entire group, including all nested items, by default.
- To move only the group name, uncheck "Move nested items with group".
Remove
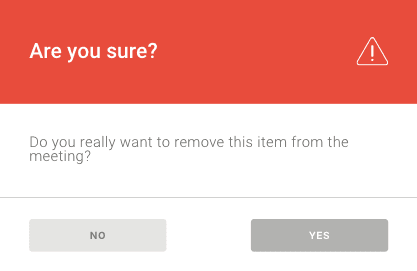
You can remove individual Groups, Tasks, or Topics from the meeting:
- Removing a Task – The task will be removed from the meeting but will remain in VOLUM3 and can still be found in the task list.
- Removing a Group – The group will be permanently deleted from the meeting. A warning window will appear, notifying you that this action is irreversible.
- Removing a Topic – The topic will be permanently deleted from the meeting. A warning window will appear, notifying you that this action is irreversible.
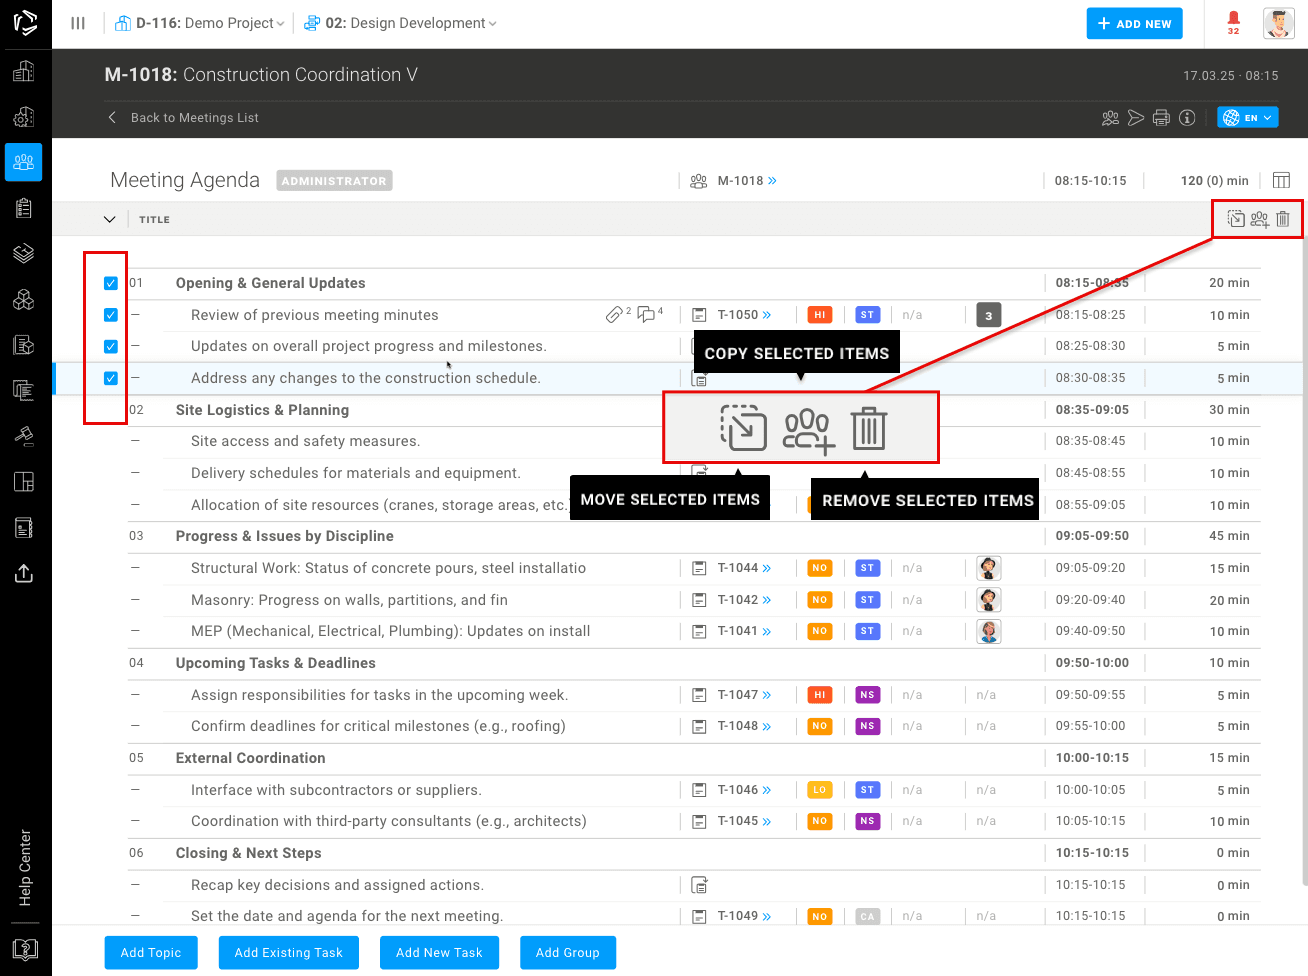
Bulk Actions
You can perform actions on multiple meeting items at once by checking the box next to each item:
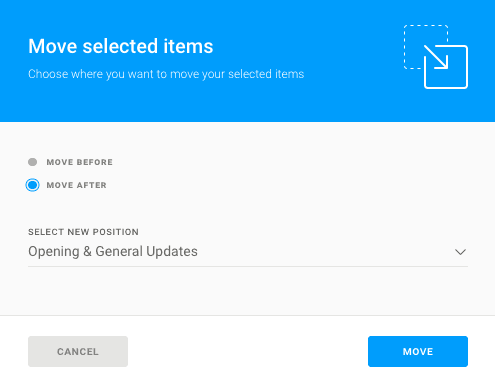
- Move Selected Items – Moves selected items up or down within the meeting. A popup window will ask if you want to place them before or after an existing item.
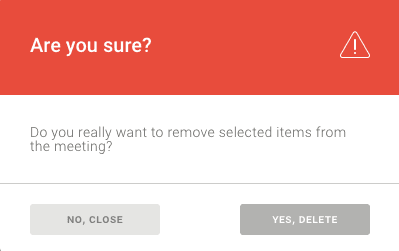
- Remove Selected Items – Deletes all selected items:
- Tasks will be removed from the meeting but remain in VOLUM3.
- Groups and Topics will be permanently deleted. A warning window will confirm the action.
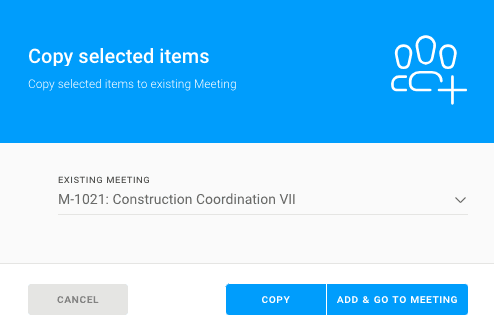
- Copy Selected Items – Copies selected Groups, Tasks, or Topics to another meeting. You can only select meetings that are not closed and where you have administrator rights to edit.
Move Selected Items - Moves selected items up or down within the meeting. A popup window will ask if you want to place them before or after an existing item.
Remove Selected Items – Deletes all selected items:
- Tasks will be removed from the meeting but remain in VOLUM3.
- Groups and Topics will be permanently deleted. A warning window will confirm the action.
Copy Selected Items – Copies selected Groups, Tasks, or Topics to another meeting. You can only select meetings that are not closed and where you have administrator rights to edit.
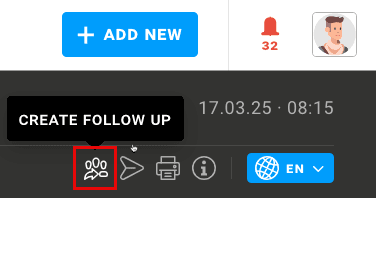
Follow-Up Meetings
Meetings are often recurring, and many tasks remain unfinished, requiring them to appear in multiple meetings. To improve the user experience, VOLUM3 allows the creation of follow-up meetings with minimal effort. Follow-Up action enables you to:
- Copy an existing meeting
- Modify the time, location, duration, and participants
- Remove topics and tasks as needed
- Save time when scheduling recurring meetings
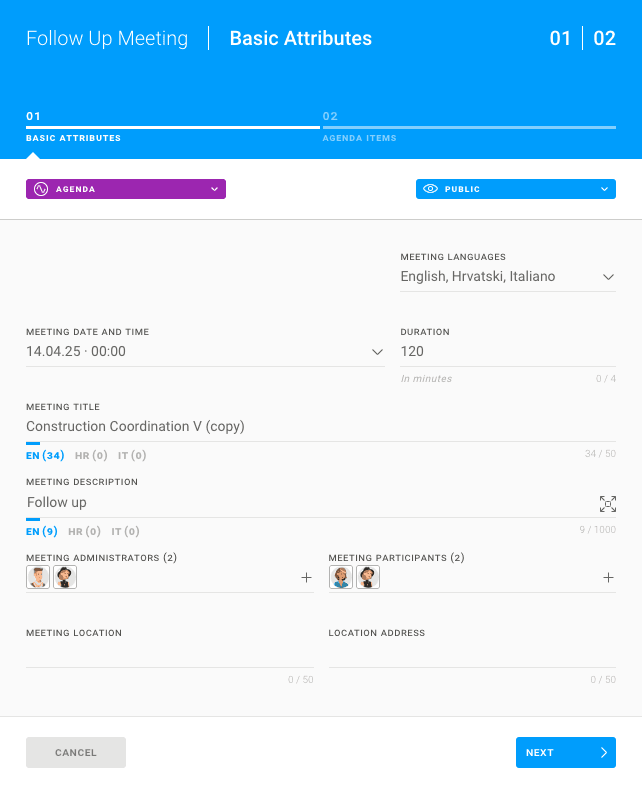
Follow-Up Meeting Wizard
The follow-up meeting setup is guided through a two-step wizard:
1: Meeting Details
- A popup window appears, allowing you to rename the follow-up meeting.
- VOLUM3 suggests the same name, appending "Copy" at the end by default. You can replace "Copy" with a number or any custom text to better differentiate follow-up meetings.
- The only required input is selecting the date for the new meeting.
- You can also update the location and time if necessary.
- The follow-up meeting will be created with the Agenda status, ensuring a smooth transition from the previous meeting.
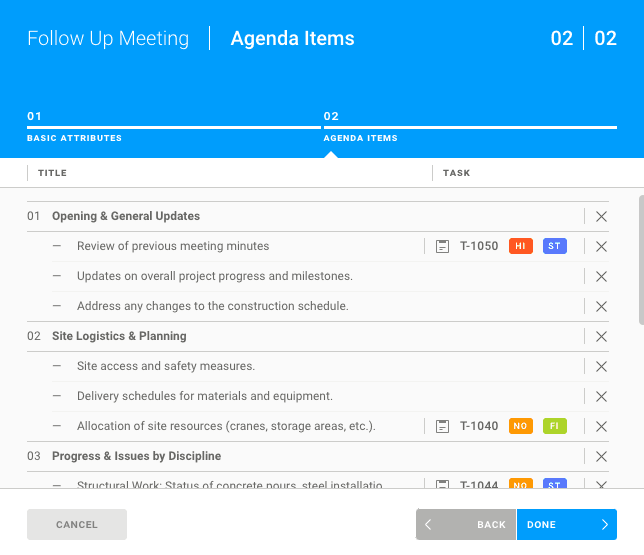
2: Meeting Content Review
- The next window allows you to remove completed or irrelevant tasks before finalizing the meeting agenda.
Note there is no automatic notification generated upon creation follow up to notify invited meeting participants you need to sent the meeting report using action
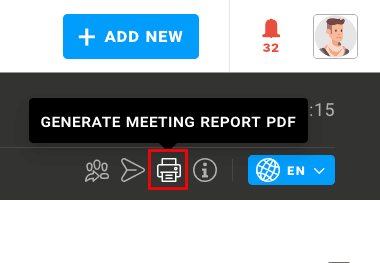
Printing Reports
To print a meeting report, click the print icon to generate a PDF formatted in A4 size. Before generating the report, you can fine-tune the details in the PDF Settings window.
This allows you to tailor the report to your specific needs, ensuring all relevant information is clearly presented.
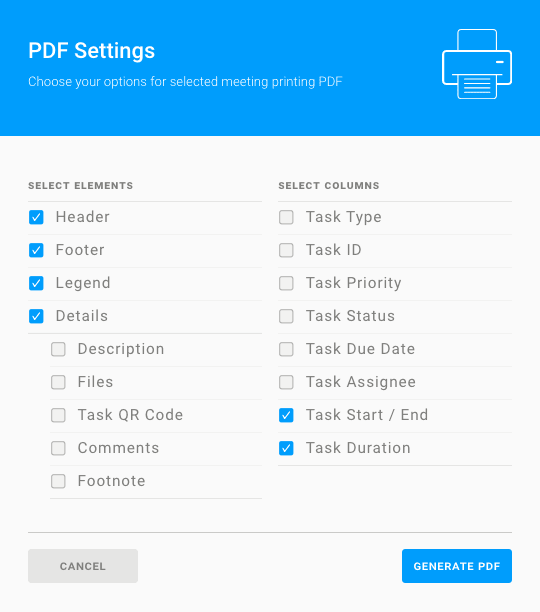
PDF Settings
Select Elements
☑ Header – Prints the header on each page of the PDF.
☑ Footer – Prints the footer on each page of the PDF.
☑ Legend – Displays a legend explaining the meeting elements.
☑ Details – Includes additional meeting details:
- ☑ Description – Prints the task description.
- ☑ Files – Includes only images uploaded to the task (other file types are excluded).
- ☑ Task QR Code – Prints a QR code with a hyperlink to each task.
- ☑ Comments – Displays all comments made on each task.
- ☑ Footnote – Prints the footnote defined in the meeting flyout.
Select Columns
- ☑ Task Type – Includes a column displaying the type of each task.
- ☑ Task ID – Prints the task identifier in the format T+ four-digit number (e.g., T1000).
- ☑ Task Priority – Displays the priority level assigned to each task.
- ☑ Task Status – Shows the current status of each task.
- ☑ Task Due Date – Includes the due date for each task.
- ☑ Task Assignee – Lists one or more assignees, using their initials.
- ☐ Task Start / End – Displays the planned start and end time of the discussion for each task.
- ☐ Task Duration – Shows the planned duration for discussing each task during the meeting.
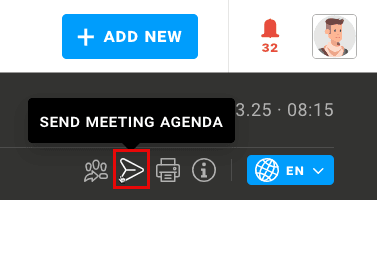
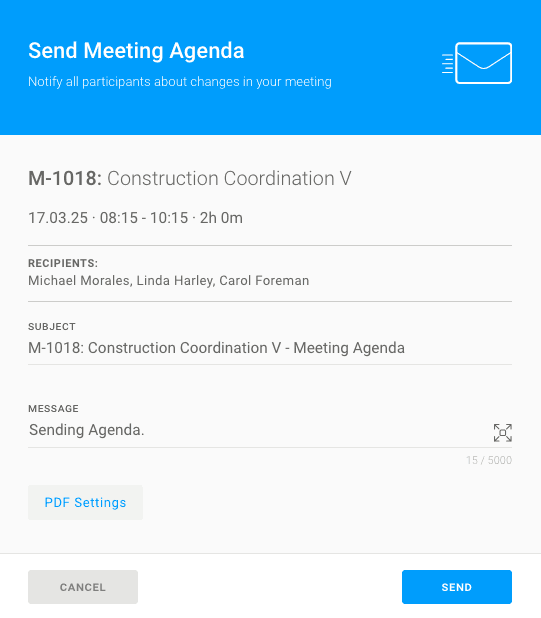
Sending Reports
To send a PDF meeting report, click the Plane Icon in the upper-right corner of the meeting or in the flyout toolbar. VOLUM3 will automatically select all Administrators, Participants, and Followers as recipients. They will receive the report via email and an in-app notification (See Notifications).
The email subject is automatically generated, but you can add a custom message in the email body. To customize which meeting items will be included in the PDF report, click the PDF Settings button before sending.
Meeting notifications
VOLUM3 provides notifications to ensure a smooth meeting workflow. There are two types of notifications:
- In-app notifications – Appear directly in VOLUM3.
- Email notifications – Sent to participants via email.
Automatic Notifications Are Triggered When:
- The meeting status changes from Agenda to Meeting Minutes.
- The meeting is closed.
- A PDF generation is completed.
- A meeting is manually sent to participants (e.g., sending the agenda for preparation).
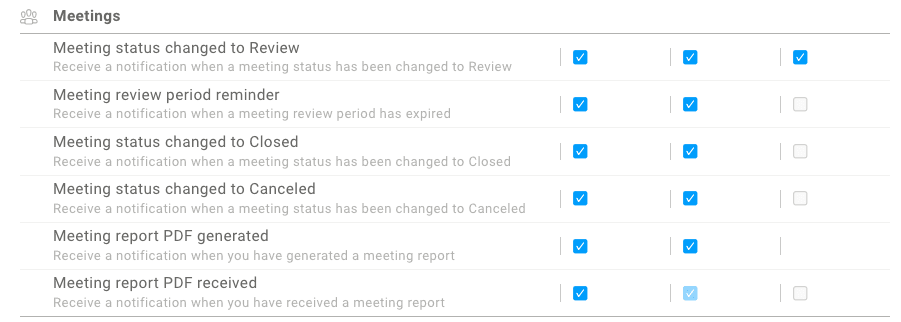
Notification Settings
Users can customize their notification preferences in Personal Settings to control which notifications they receive.
Meetings

Trg E. Kvaternika 3/3, 10 000 Zagreb, Croatia
+ 385 1 333 1909 info@volum3.com


