Interactive Schedules
VOLUM3's Interactive Schedules replace traditional spreadsheets with dynamic, browser-based interactive schedules editable on screen. This streamlines project specification management and boosts productivity by allowing teams to efficiently collaborate and flexibly manage FF&E and other elements, reducing errors and making updates or revisions more straightforward. Interactive schedules allow the editing of specification attributes in a transparent way and the creation of as many schedules as needed (e.g. doors, windows, finishes, furniture) providing a clear, comprehensive project overview.
To access Interactive Schedules, click on the module Specifications in the left menu - in the submenu, click on Interactive schedule.
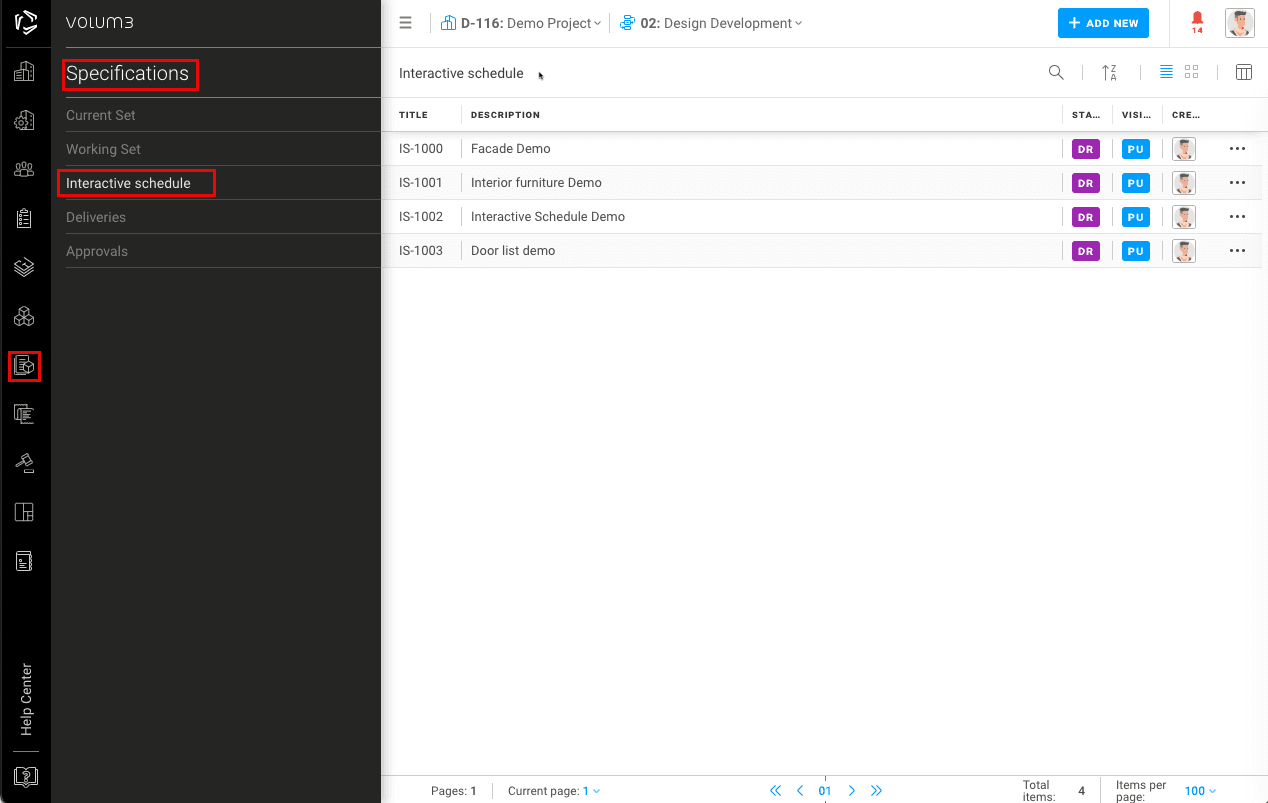
List of interactive schedules
In VOLUM3 on each project users can create multiple interactive schedules that are all visible and accessible through interactive schedule lists. This list shows all interactive schedules with administrators, editors statuses.

Create a new Interactive Schedule
Set up a structured schedule by selecting specifications, defining attributes, and organizing data.
A) Create from scratch
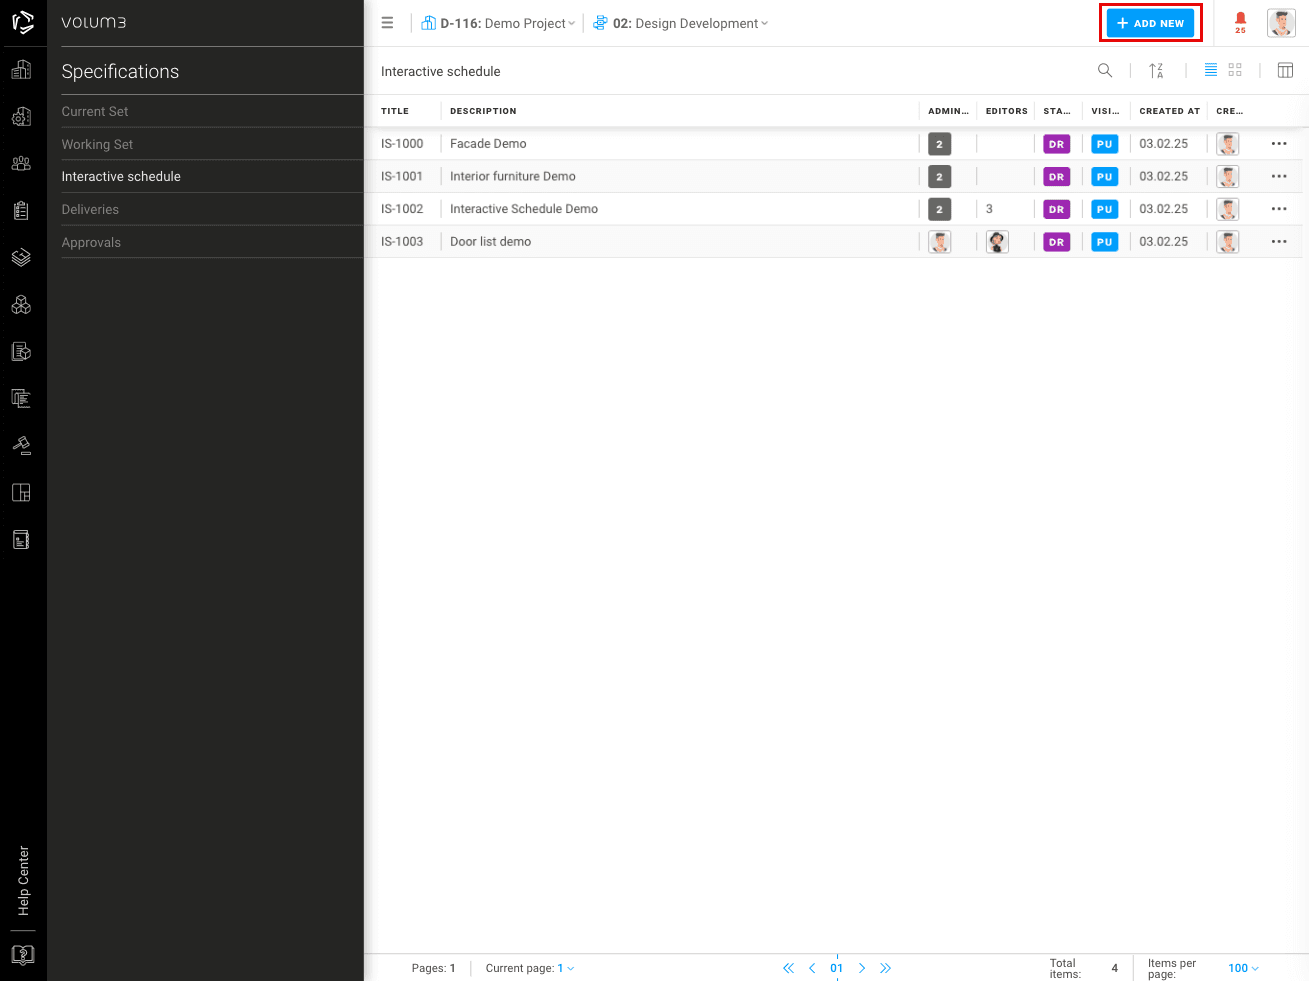
To create a new Interactive Schedule:
- Click the “+ ADD NEW” button in the upper-right corner.
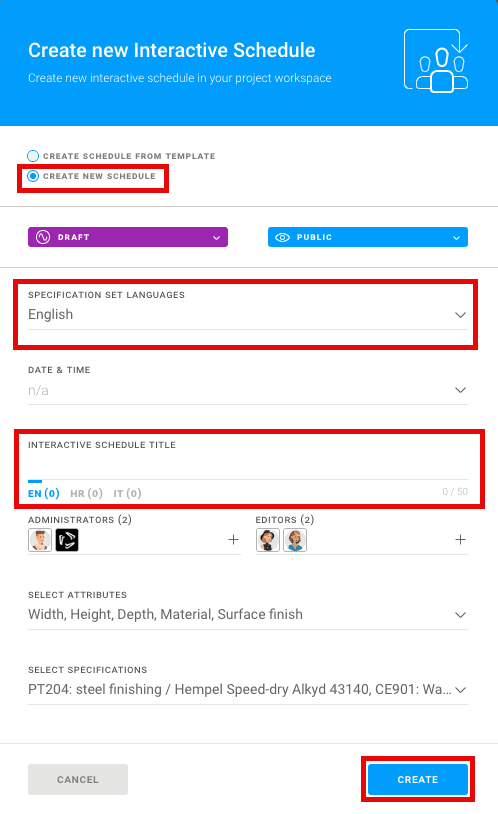
- A Pop-up Wizard will appear - in the wizard fill in all the mandatory fields. Click the “CREATE” button to create your schedule.
When creating a new Interactive Schedule in VOLUM3, you can customize date, time, and language settings to match project requirements.
Date & Time: Define key scheduling dates, including creation and update timestamps. This ensures precise tracking of changes and project progress.
Languages: Select preferred languages for the schedule to ensure clarity for all stakeholders. This is useful for multilingual teams, allowing seamless collaboration and understanding.
B) Create from template
Create a new Interactive Schedule from a presaved company template.
- Open the Interactive Schedule Section and navigate to the Interactive Schedule area
- In the upper-right corner, click the “+ ADD NEW” button.
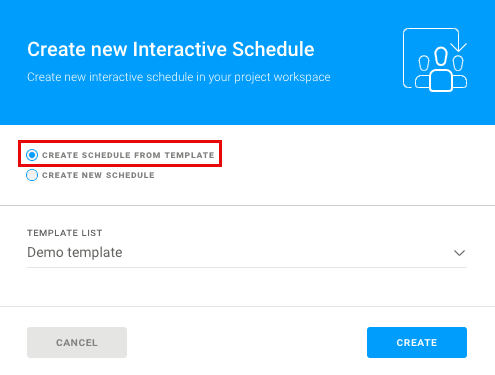
- In the pop-up window, choose the "From Template" option.
- Select an existing template from the list that best fits your needs.
- Finalize your schedule by clicking the “CREATE” button.
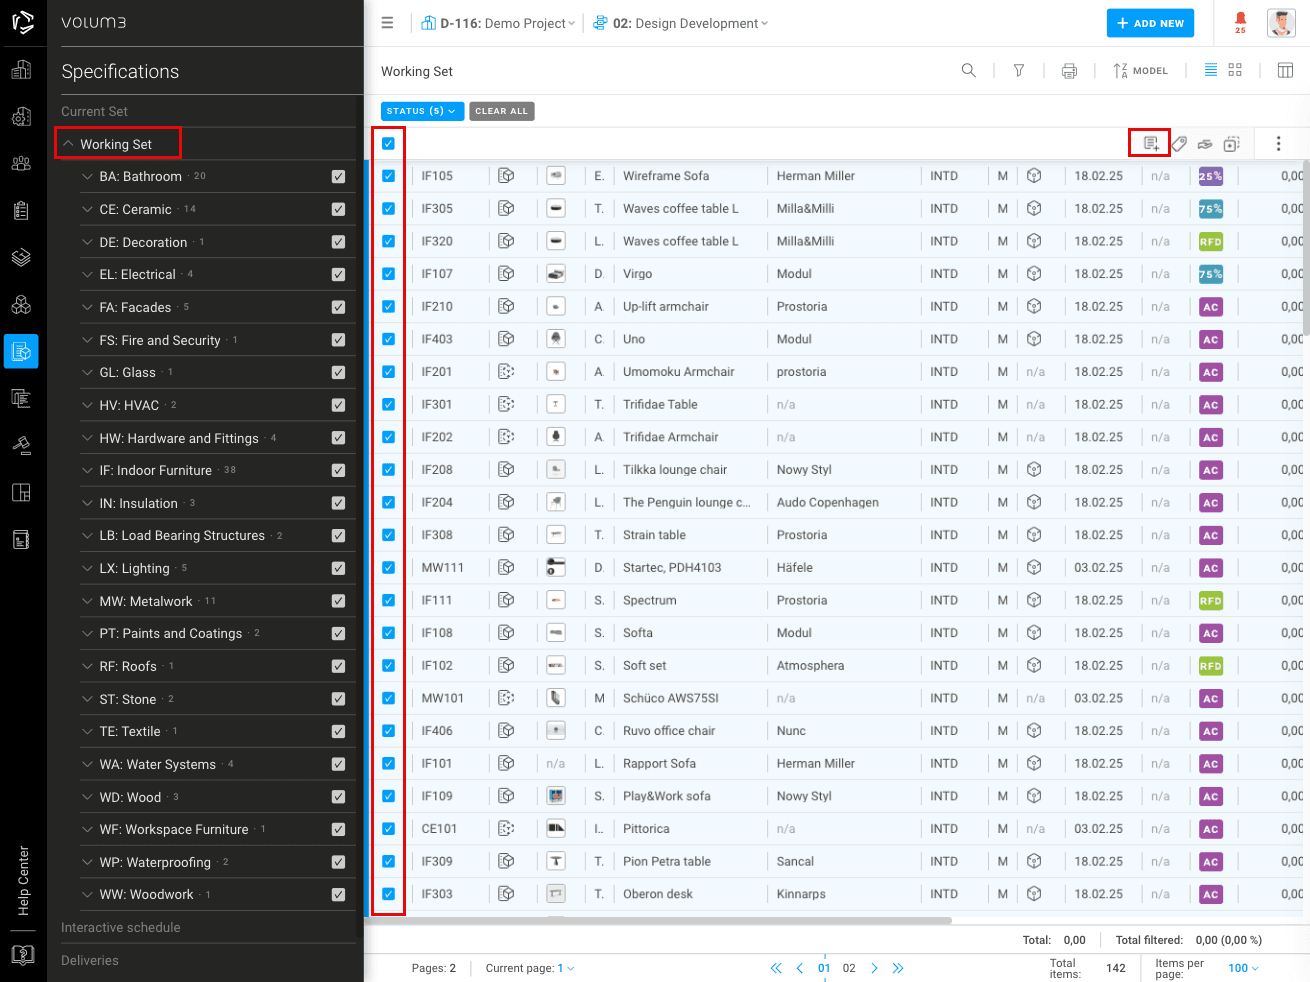
C) Create from Working set
Another way to create an Interactive Schedule is by selecting specifications from your Working Set. To do that:
- Select the specifications in the working set you want to add to the interactive schedule (e.g., all windows and doors or an interior furniture schedule). Once selected, the actions menu will appear in the upper-right corner.
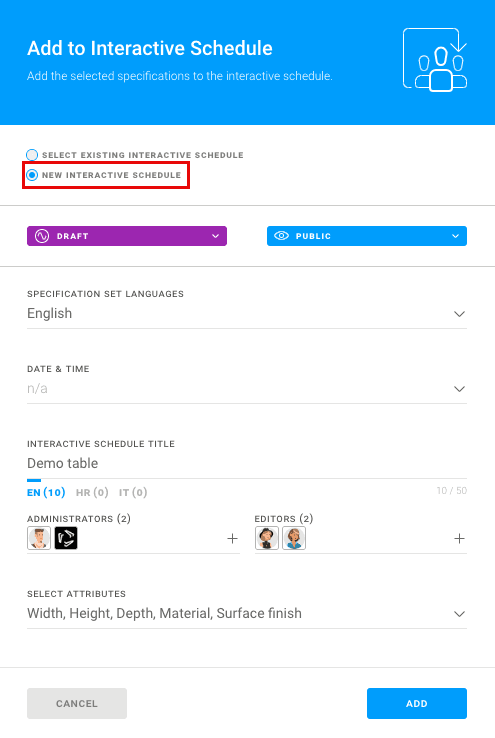
- Click "Add to Interactive Schedule", and the Pop-up Wizard will open.
- Choose one of the following options:
- Create New: Make a new interactive schedule
- Select Existing: Choose an existing interactive schedule to add to
4. To complete the process, click "ADD".
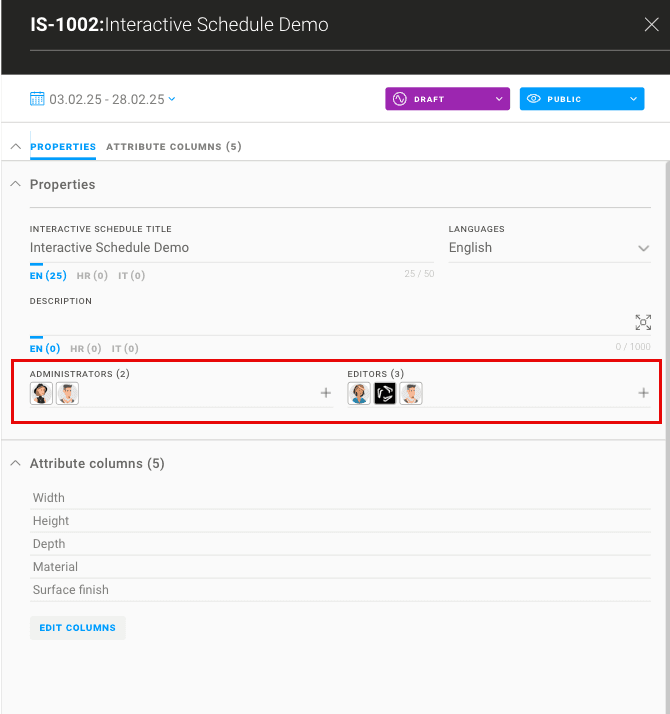
Roles
There are two primary roles in Interactive Schedule - Administrator and Editors. Only project members can be assigned to these roles.
Administrator: Can create, edit, and cancel tables; assign users (administrator, editor); manage columns and attributes.
Editor: Can edit the content of schedules, such as modifying specification attributes or adding details, but cannot modify the structure of the schedule (e.g., adding or removing columns) or manage roles and permissions.
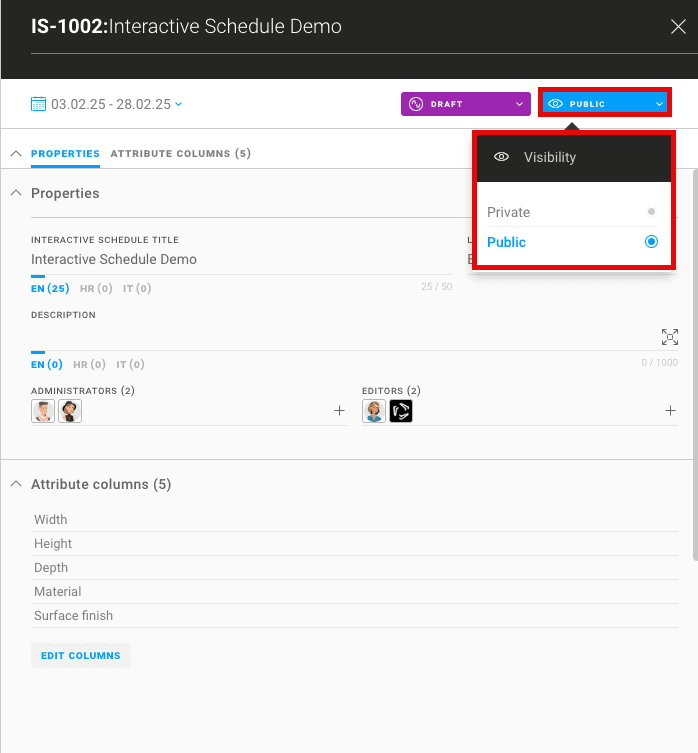
Visibility and access rights
Control access and visibility to interactive schedules to enable secure and efficient collaboration. By default, schedules are public and visible to all project members. However, you can also set them to private to limit visibility.
- Public: Visible to all project members
- Private: Restricted access - visible only to the Administrators and editors selected in the properties of the schedule.
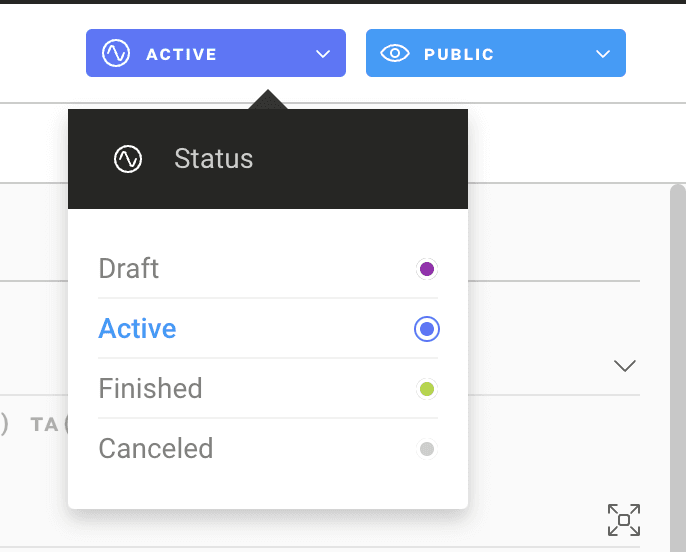
Interactive Schedule status
The administrator can assign various statuses to each Interactive Schedule:
- Draft: The schedule is not yet ready for editing.(initial status)
- Active: The schedule is available for all administrators and editors to work on.
- Finished: The schedule is complete and cannot be edited further.
- Canceled: The schedule has been canceled and cannot be edited
Interactive Schedules items
Interactive Schedules can contain two different item types: specifications and generic specifications.
Specifications: These are detailed descriptions of materials and equipment, that include information such as codes, description, manufacturers, physical attributes, instructions and quantities.
Generic Specifications: These act as placeholders for items not fully defined at the moment. They allow users to input basic information, which can be updated to create full specifications later on. Generic specifications are particularly useful during the early project stages when complete data is not available yet.
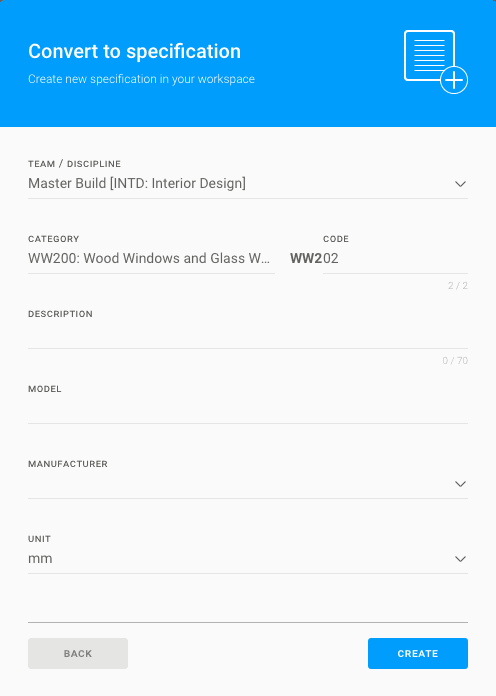
Action "Convert to specification" can be used at any time to convert generic specifications into specifications.

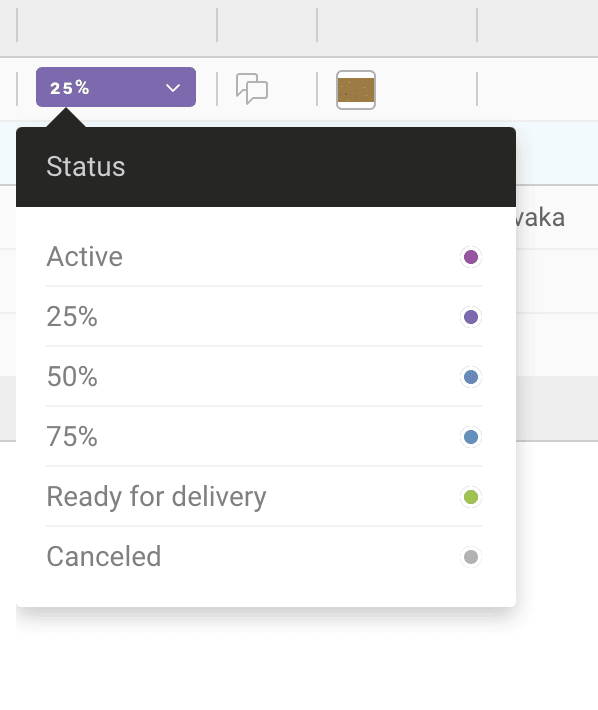
Specification Status
There are 6 available statuses that administrators and editors can manually assign to each specification to easily track the specification statuses:
- Active: Initial stage of the project
- 25% Complete
- 50% Complete
- 75% Complete
- Finished: The specification is finalized and ready for delivery
- Canceled: The specification is no longer needed
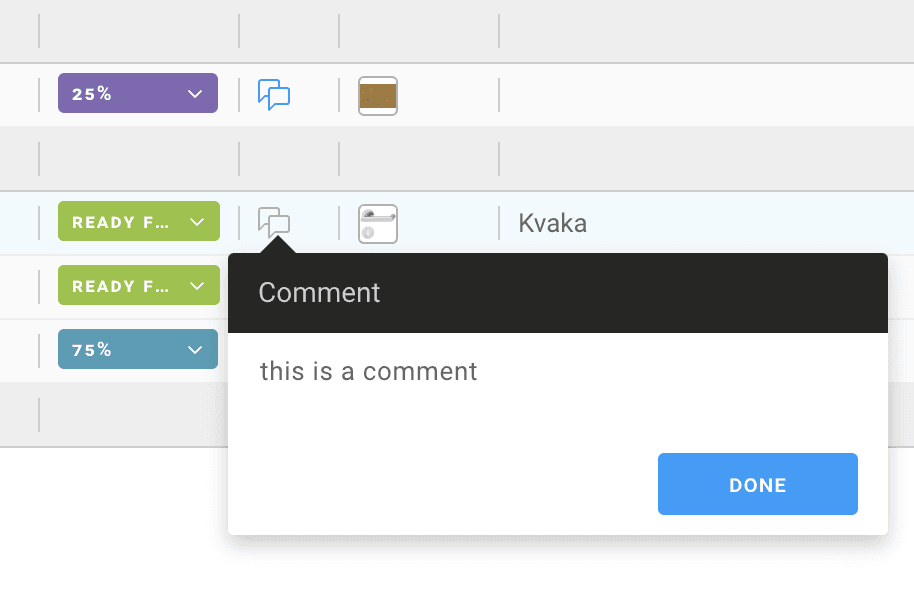
Comment column
Streamline collaboration and communication by directly commenting on specifications within the comment column. Specifications that contain comments will be indicated by a blue chat cloud.
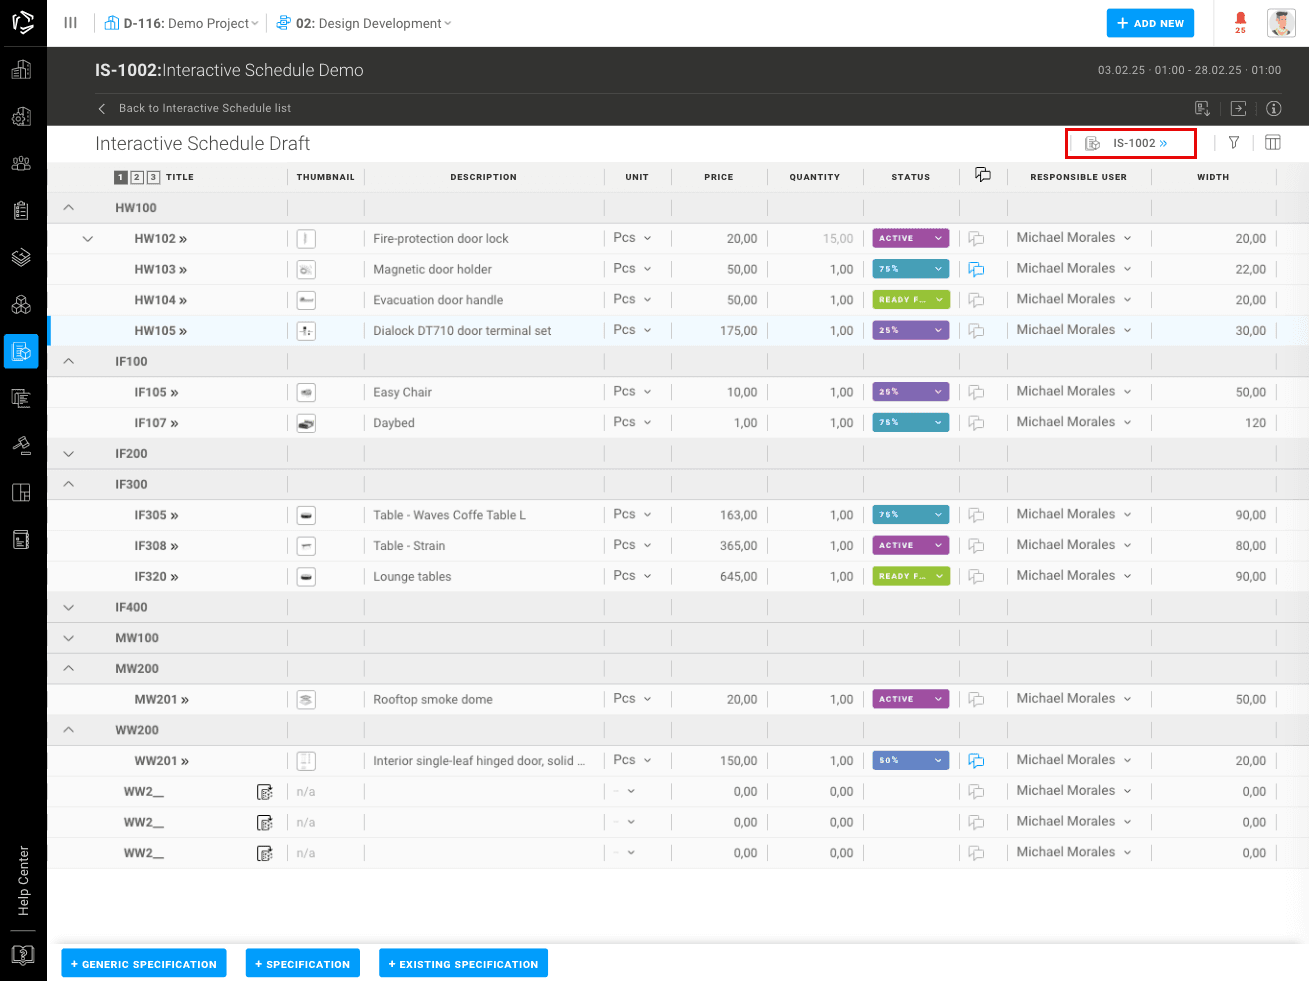
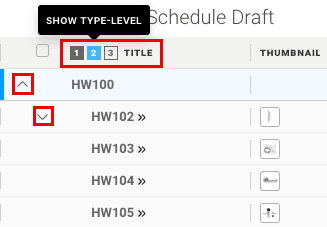
Hierarchical structure of Interactive Schedules
Interactive Schedules operate on three hierarchical levels to ensure precise data organization:
Specification Group: The highest level, representing a collection of related specifications.
Specification: The individual item within a group, containing detailed data.
Element: Instances of item contents throughout the project locations (Areas).This is used to track finer details like specification allocations and sub-quantities.
To change the hierarchical level, click on the number icon of the level in the top left corner or click on the arrow on the left to manually expand the levels.
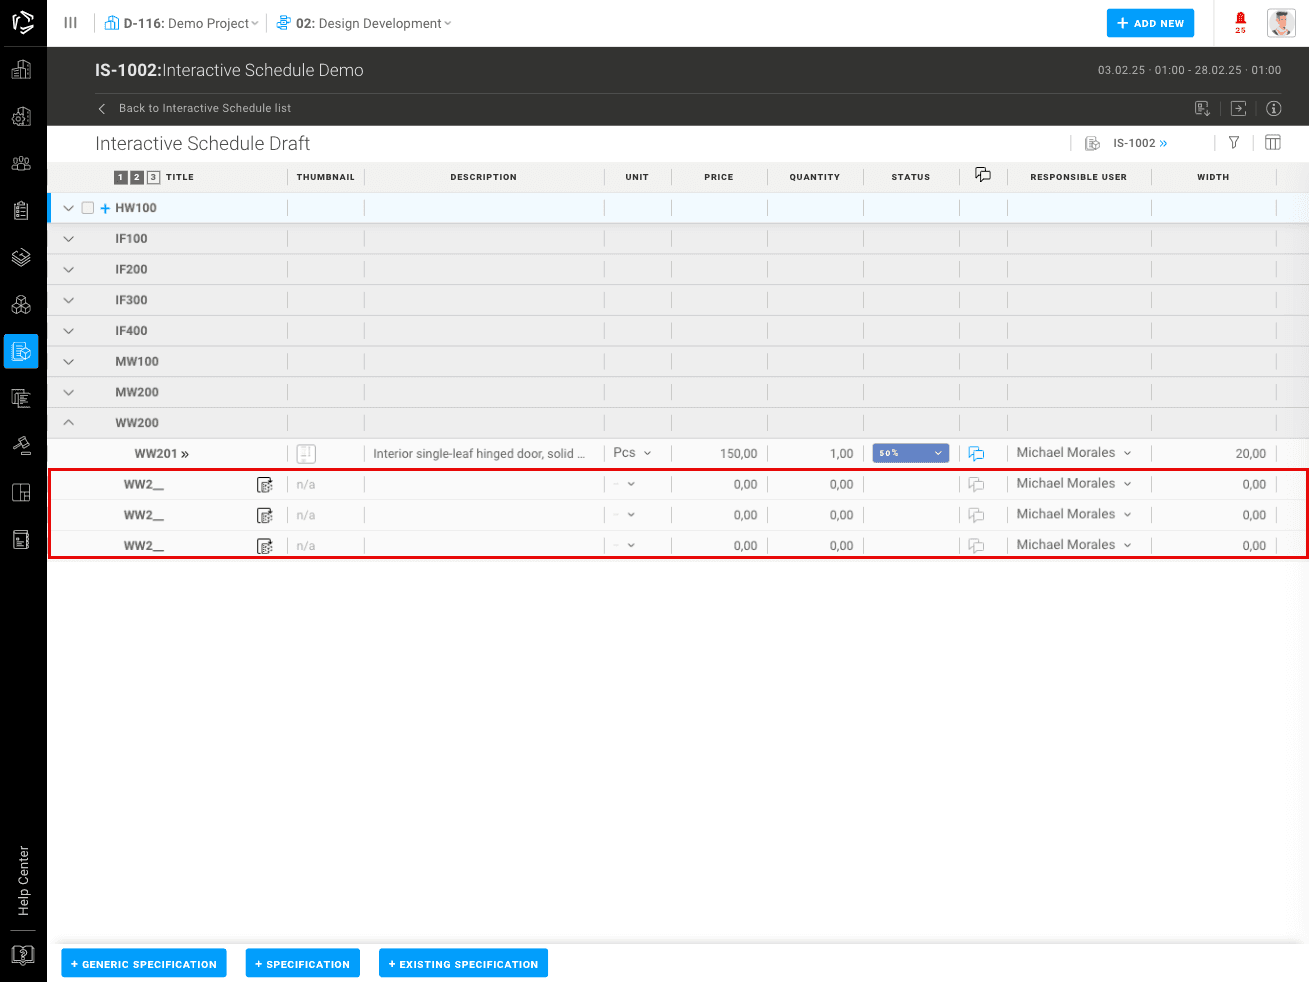
Unallocated items
Unclassified generic specifications are placed in the Unallocated Specifications section upon creation.
You can find this section at the bottom of the schedule.
Unallocated generic specifications can be categorized at any point. For instance, if you're indecisive about choosing between wooden (WW200) or metal (MW200) windows, leave the specification unallocated until you've made a decision.
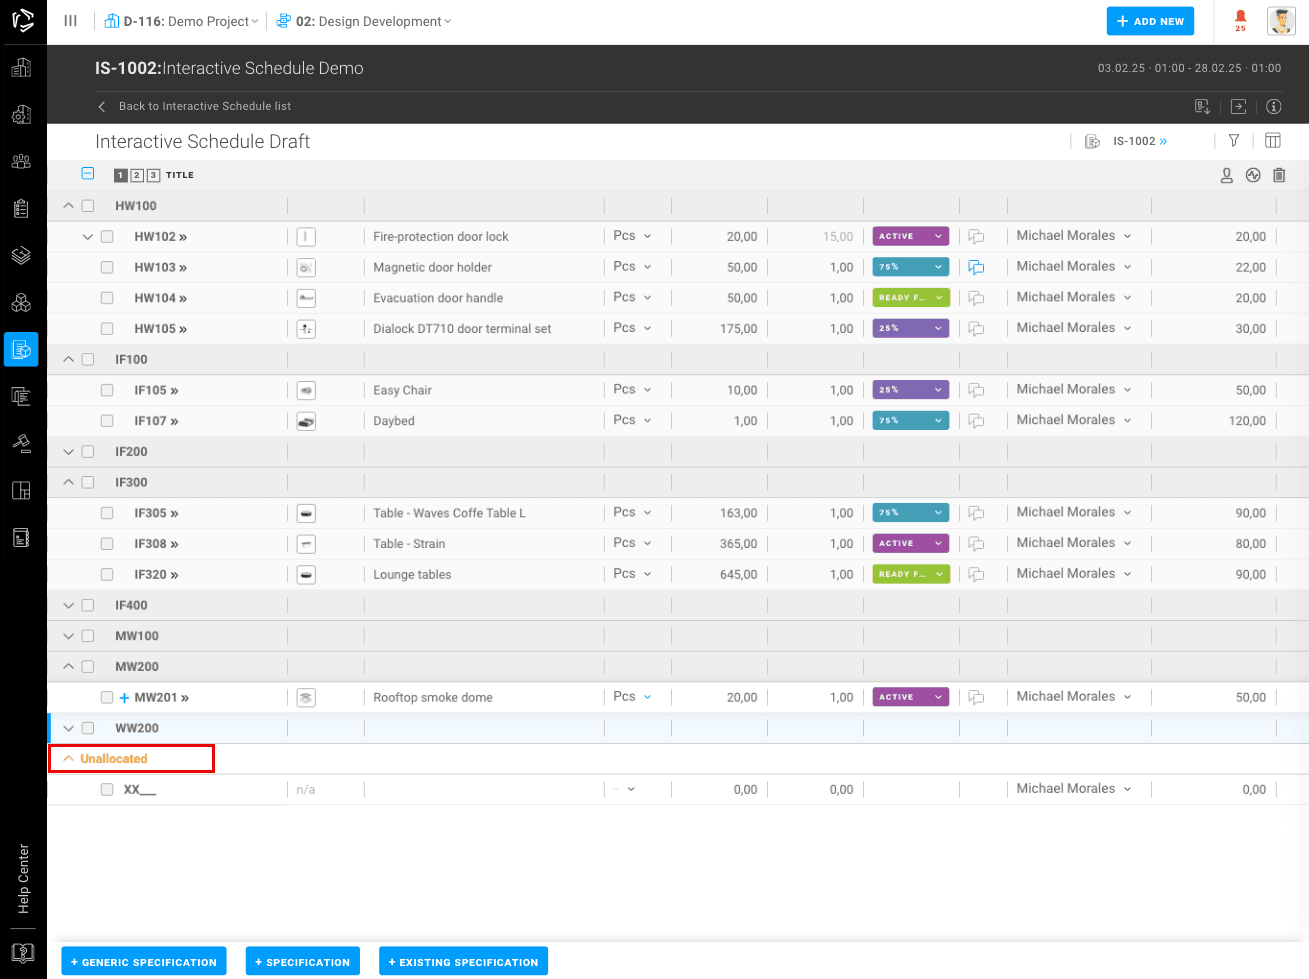
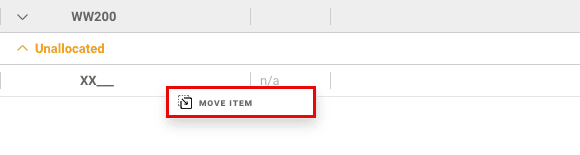
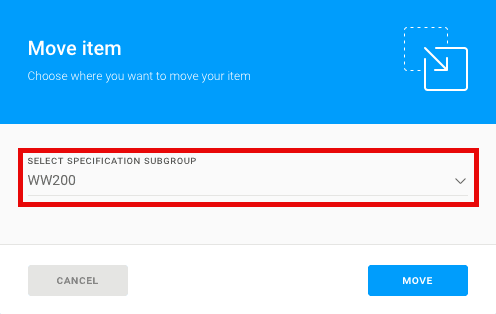
To allocate a generic specification, right-click on it (or select three dots at the right end) and select "Move Item". In the pop-up window, choose the desired specification subgroup and click "Move".
Interactive Schedule columns
There are multiple columns in the Interactive schedule.
Default columns
- Specification Code -A code consisting of two letters followed by three numbers is used to represent a specification.
- Thumbnail - displays column with the thumbnails for each specification
- Description - short description of the item
- Unit - unit of measurement
- Price - price per unit
- Quantity - quantity of items of units required.
Additional columns
- Status
- Comment
- Manufacturer
- Linked Specification
- Parent Specification
- Supplier
- Responsible user
Attribute columns
The columns for attributes can be completely customized to fit the needs of your specific project or the items you are working on.
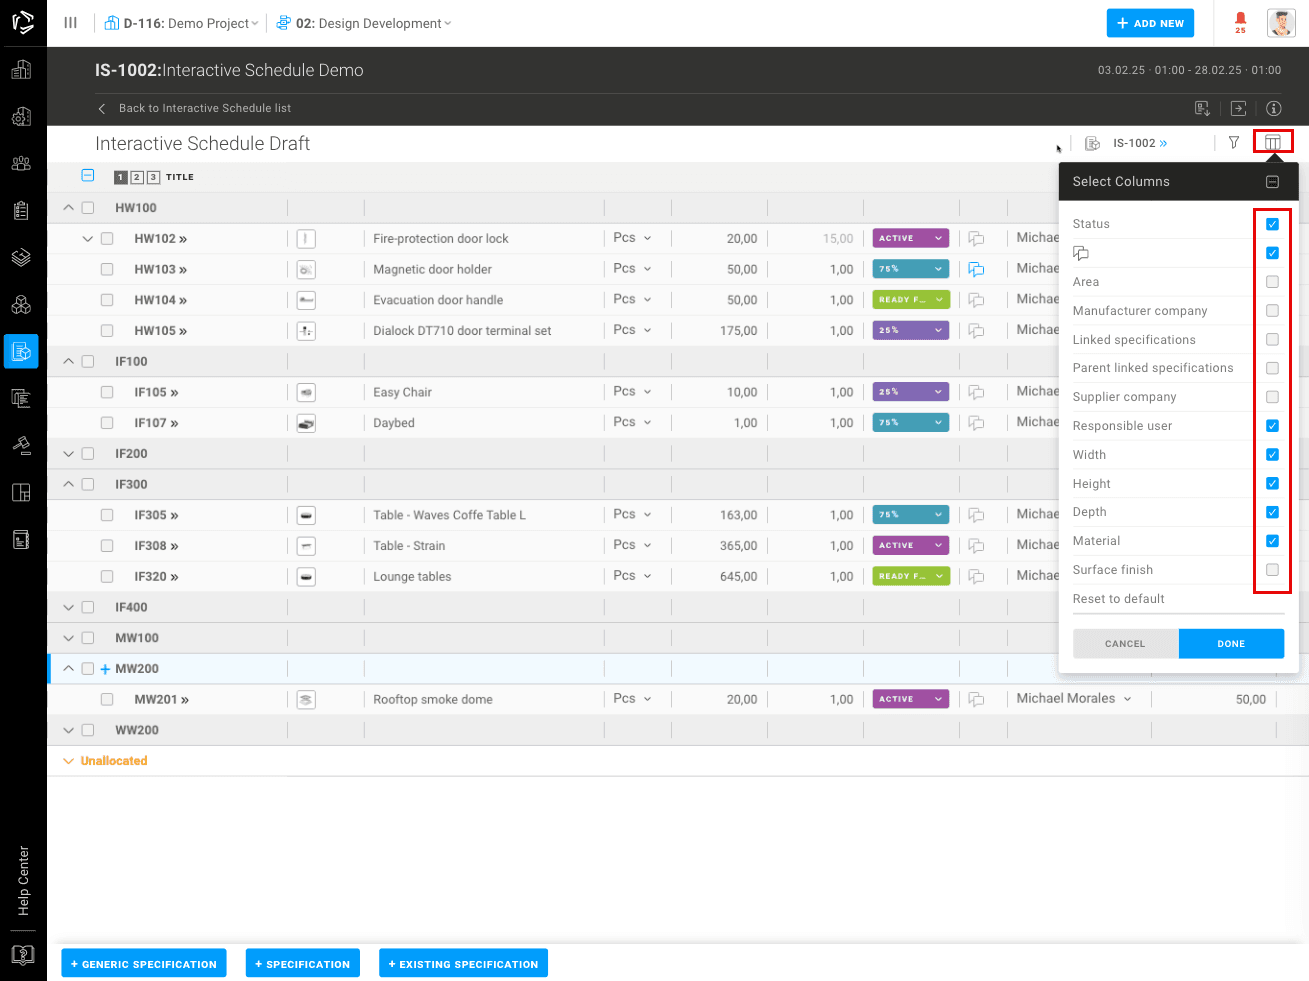
Show / Hide columns
Columns visibility: You can show or hide columns in Interactive Schedules by opening the Column Settings menu from the table toolbar - check or uncheck individual columns to adjust the view. They are not removed just hidden and can be displayed again at any moment
Reset to default - resets column visibility to default values
The checkbox located within the black line at the top enables you to select or deselect all columns simultaneously.
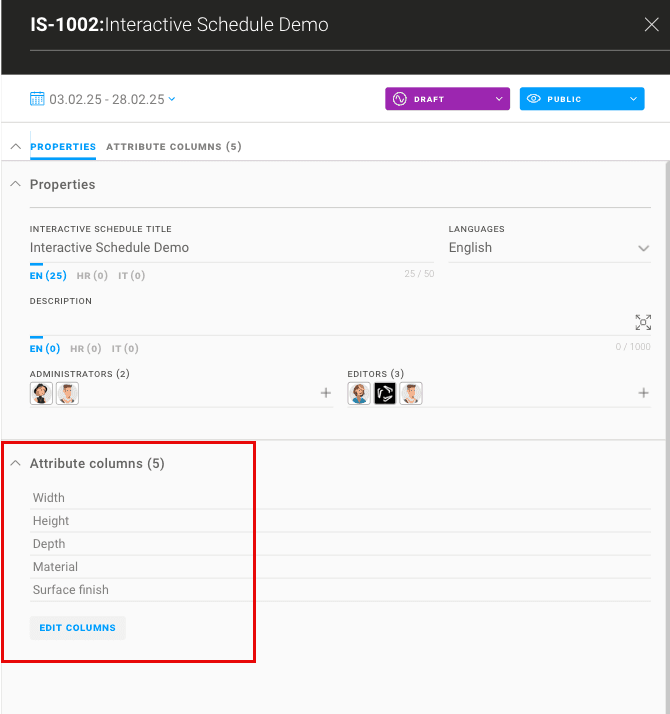
Managing Interactive Schedules attributes
The attributes for Interactive Schedules can be customized by adding or removing columns. The attributes in the schedule should be relevant to its contents. For example, the attribute columns for schedules for windows, furniture, or floors will differ from the other schedule types. You can choose the attributes from a predefined VOLUM3 attribute list.
- Click on Interactive Schedule properties - flyout window will open.
- In the flyout window, select “Edit columns” in the Attribute columns section - pop up window will open.
- Choose the attributes you want to include and click “DONE”.
Use the search function to find attributes faster.
You can customize your Interactive Schedule at any time by adding or removing attribute columns from the schedule.
To do that, follow these steps:
- Open the Interactive Schedule and navigate to the schedule you want to edit.
- Access Column Settings and click on the “Edit Columns” option in the table toolbar.
- Modify Columns - a list of available attributes will appear. Check the attributes you want to add or uncheck those you want to remove.
- Apply Changes
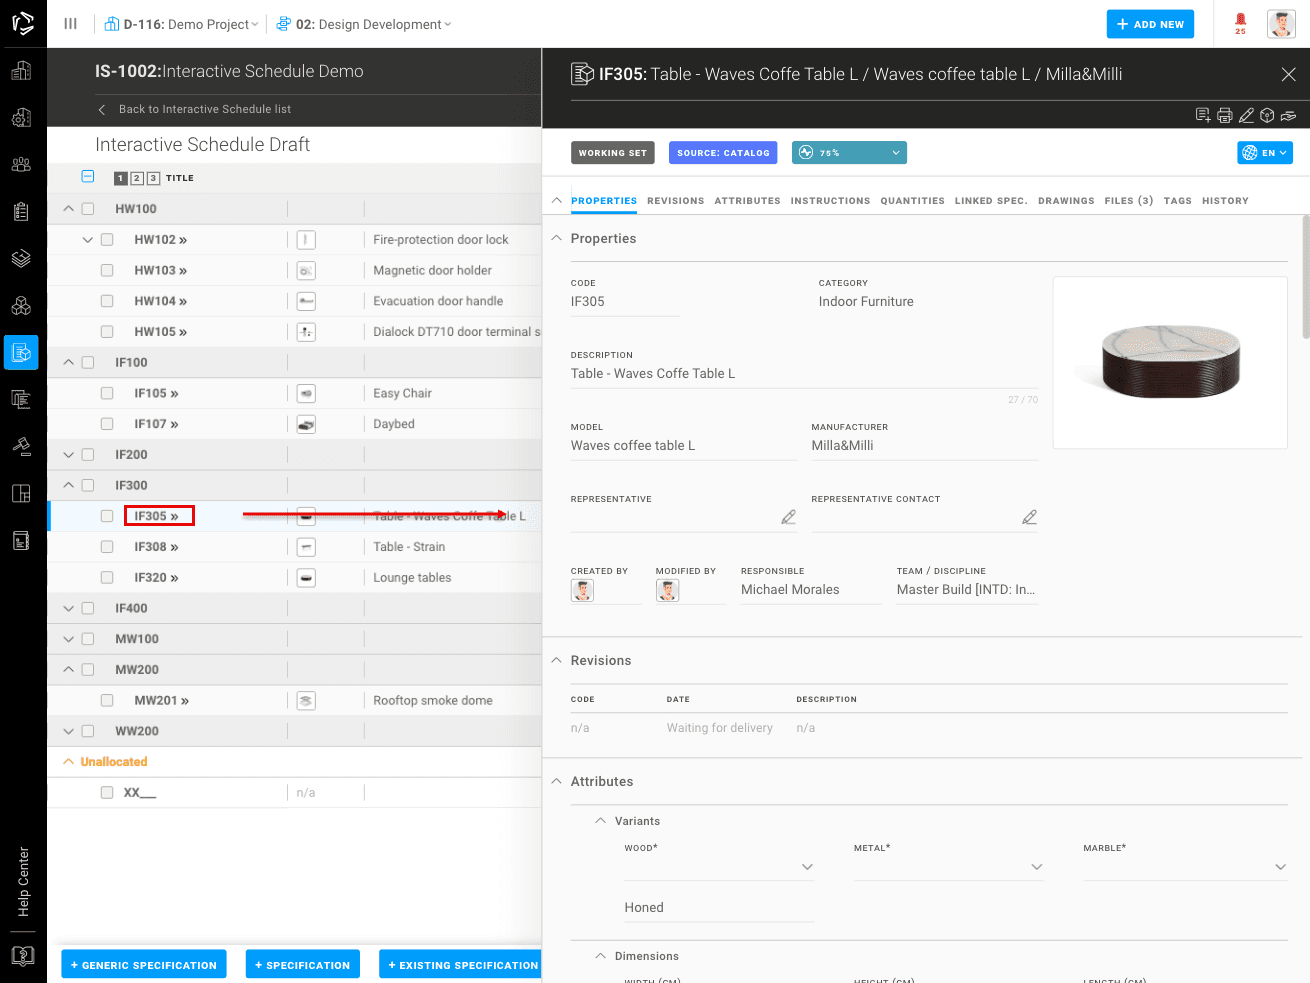
Your modifications will be applied instantly and the updated columns will be visible in both the schedule view and in the specification Flyout.

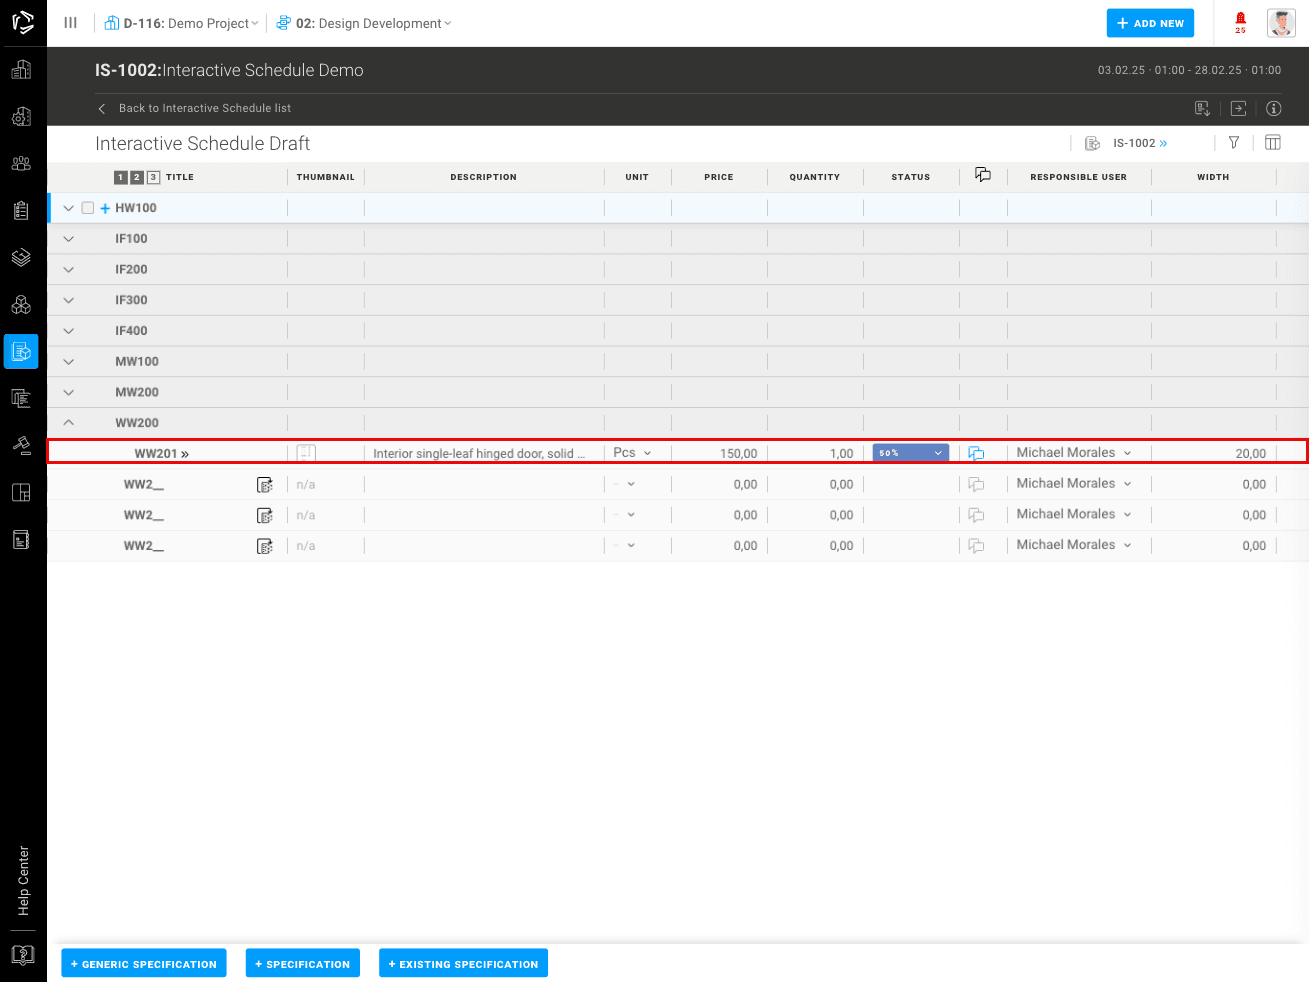
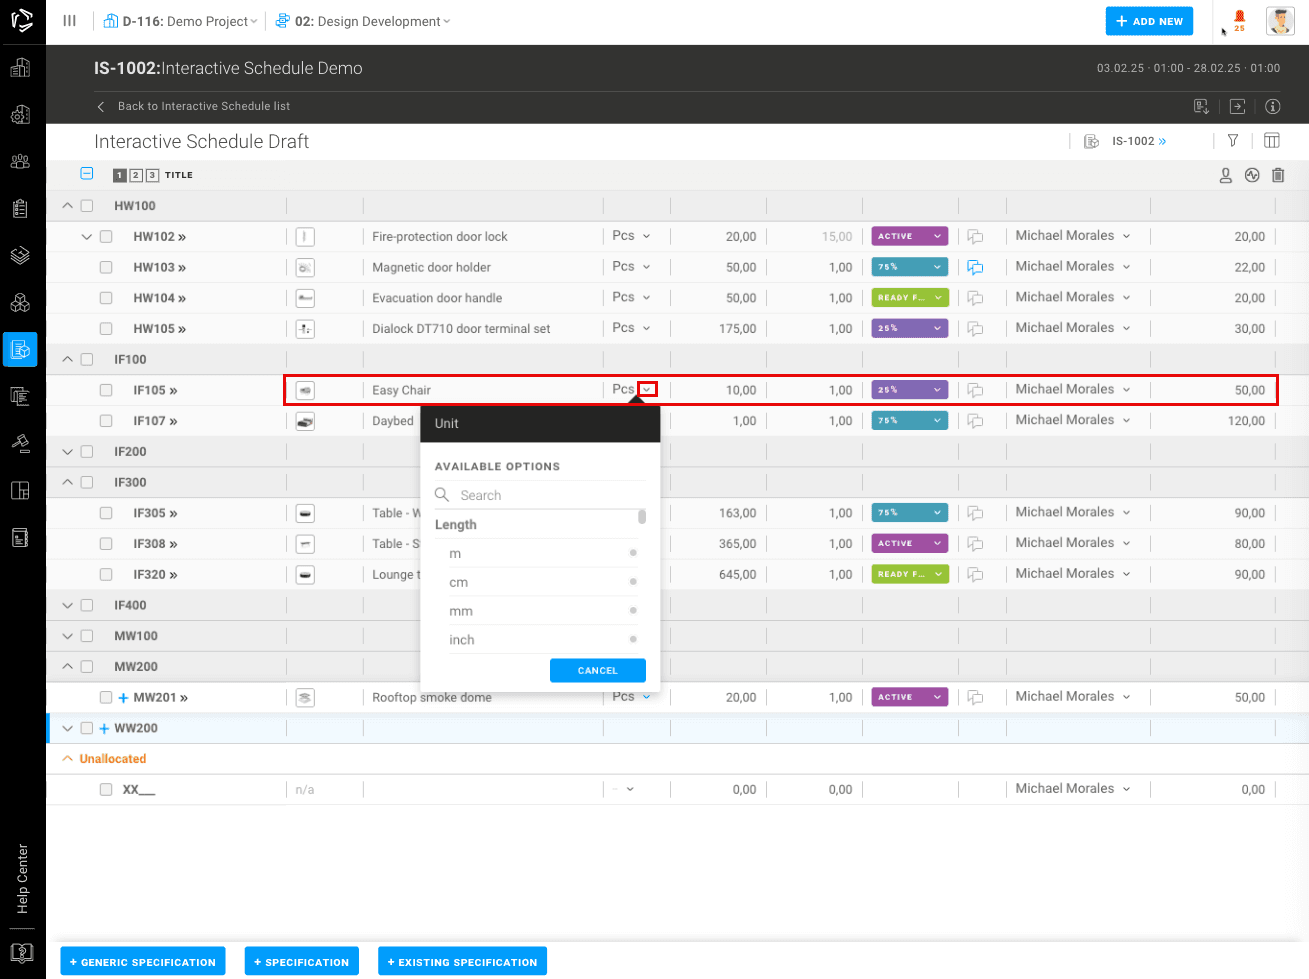
Inline editing
VOLUM3's Interactive Schedules allow on screen real-time editing. Values can be modified directly within the schedule by inputting text or numbers, or through attribute dropdown menus. All updates are automatically synced with the specification flyout, ensuring that project specifications are always up-to-date.
Inline Editing: Data types, including numerical, text, and dropdown menus, can be edited directly within the schedule. This allows for information and attribute modification without the need to open additional windows.
Flyout Panel: Edit detailed specification data, such as properties, attributes or instructions in the flyout window on the right side of the screen. Changes made in the Flyout are instantly reflected in the interactive schedule and vice versa.
Actions
Actions in Interactive Schedules allow users to move, remove, add, convert, and manage specifications and elements efficiently through contextual menus and quick-access buttons.
Individual Actions:
- Move – Relocate a specification to a different subgroup.
- Remove – Remove an item from the schedule. Generic specifications are permanently deleted, while specifications are removed but retained in the Working Set
- Add Generic Specification – Insert a placeholder for final specification without predefined details.
- Add Existing Specification – Add an existing specification from the project Working Set
- Add Element – Include an additional element to the Specification.
- Add Linked specification - Connect specifications with the specifications of their sub-components
- Convert to Specification – Transform a generic specification into a detailed specification. The popup window will appear
How to Access Actions
Actions can be triggered contextually in multiple ways:
- Three-Dots Menu (⋮) – Click to reveal additional options.
- Plus “+” Button – Quickly add items below the current item.
- Right-Click – Open a context menu with relevant actions.
- Top “Add +” Button – Access actions for item creation.
- Buttons at the bottom of the screen - Quick item creation
Group actions
Actions in Interactive Schedules can be applied to multiple selected items. The feature is hidden until you select items in schedule. Select individual items by clicking the checkbox to their left. To select all items within a group, click the checkbox for the group.
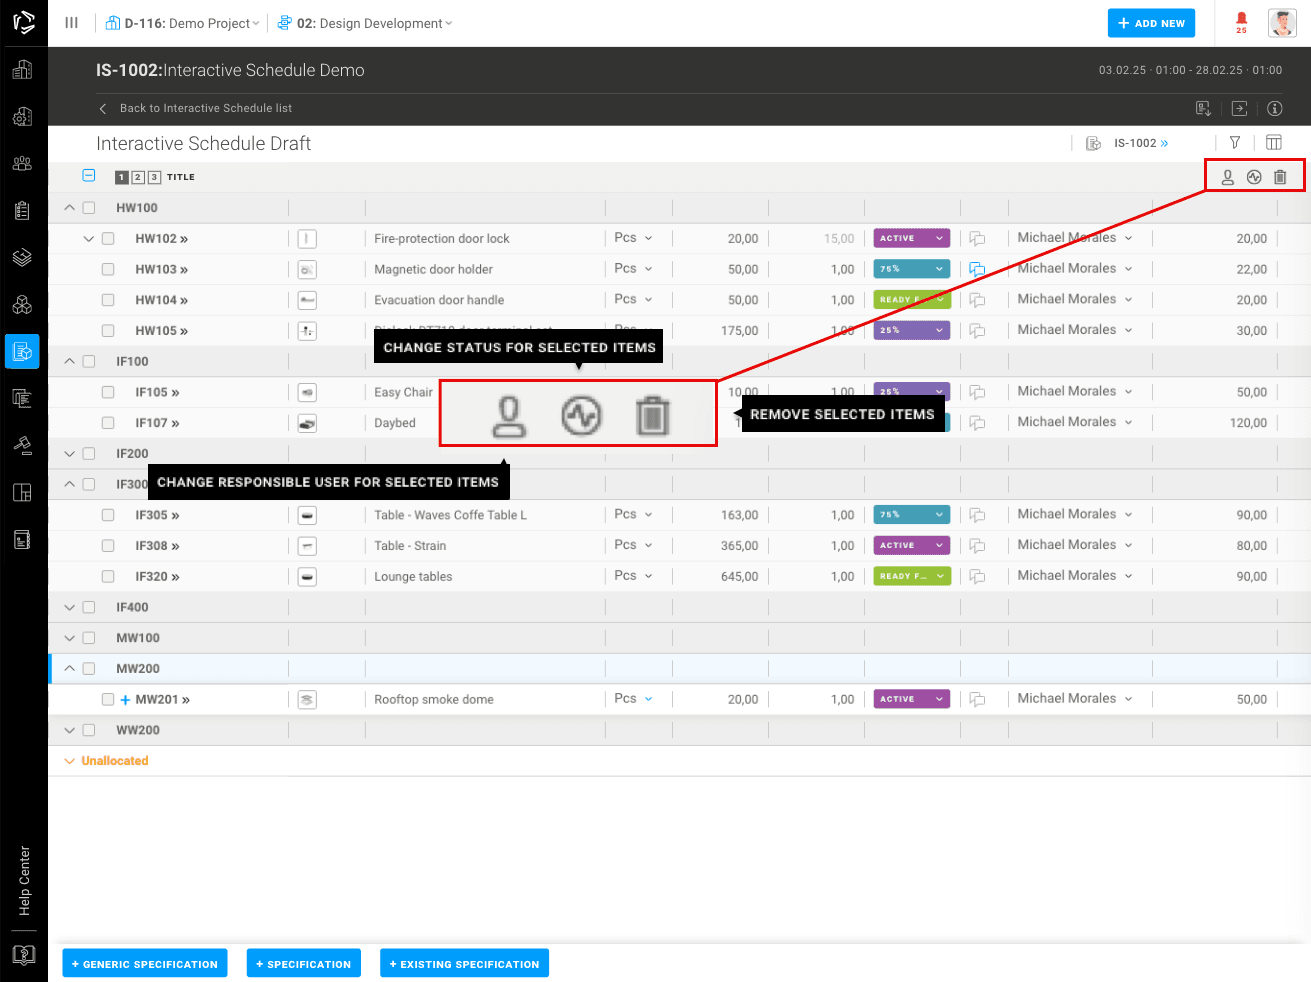
Currently these group actions are available:
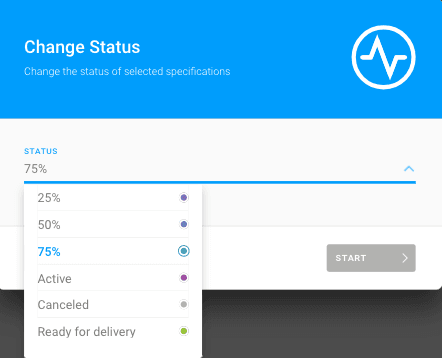
Change Status: Update the status of one or more selected items (e.g., move from Draft to Active).
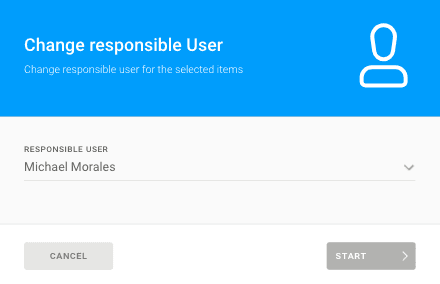
Change Responsible User: Assign or reassign responsibility for selected items.
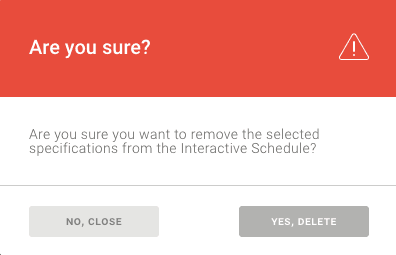
Remove Items: Remove items from the table (Generic specifications are permanently deleted, while specifications are removed but retained in the Working Set).
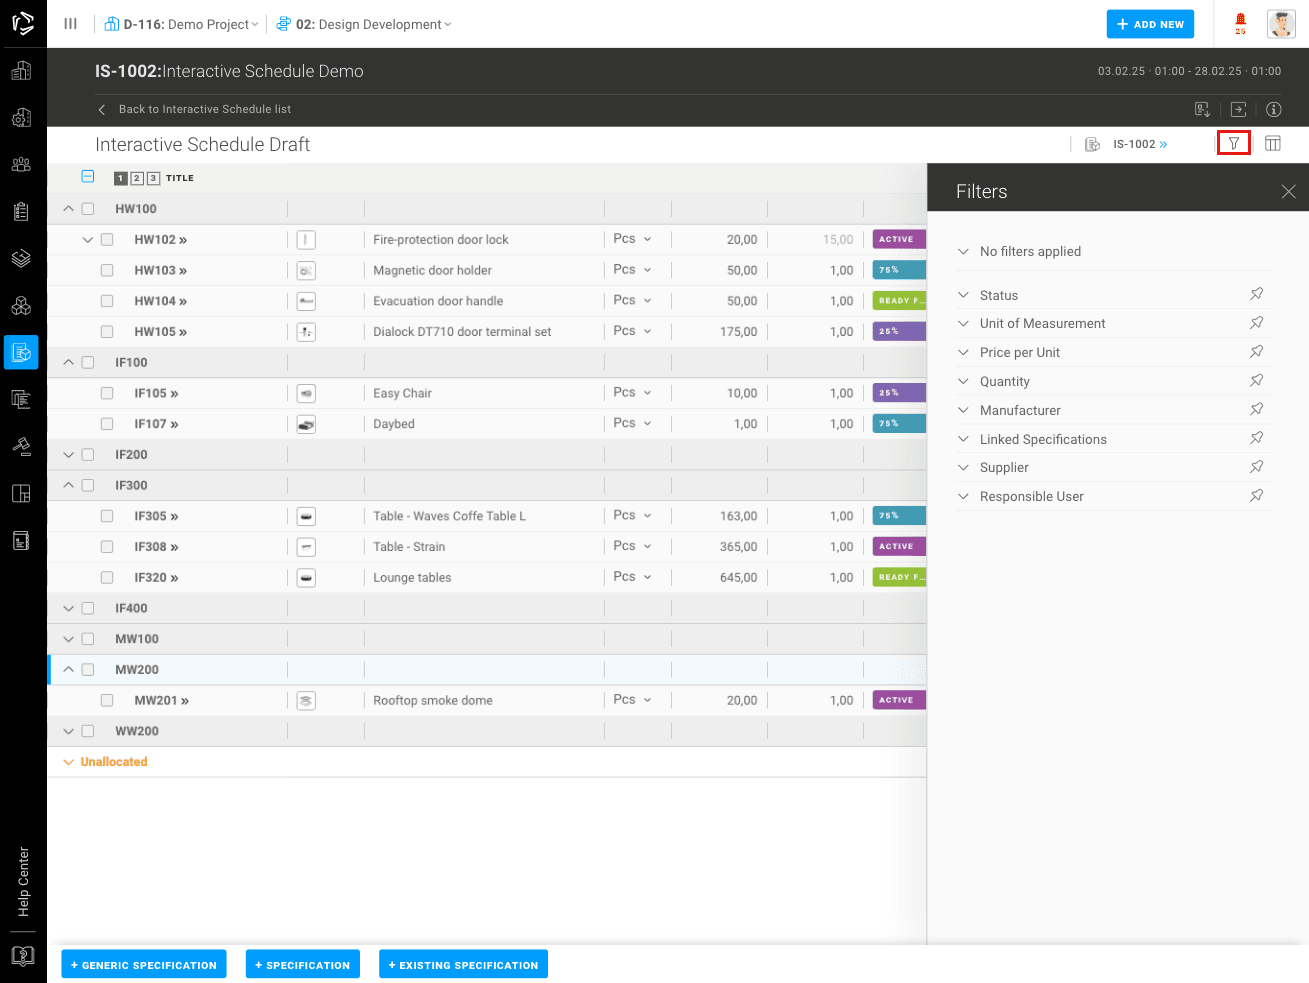
Filters
Access filters by clicking the funnel icon in the upper right corner. To keep your frequently used filters on the toolbar, pin filter elements from the filter panel. To clear the selected filter options, use the “Clear all” action. This resets the selected filter options without removing the filter from the toolbar. To completely remove filters from the toolbar, simply un-pin them.
Interactive Schedules include the following filtering options to help users locate and organize data efficiently:
- Status: Filter items based on their status (e.g., Active, 25%,50%,75% , Ready for Delivery, or Canceled).Unit of Measurement: Narrow down specifications by their measurement units.
- Price per Unit: Filter items based on unit pricing.
- Quantity: Show items with the specific quantity ranges.
- Site, Building, Storey, Room: Organize specifications by its physical location within the project.
- Manufacturer: Search for items based on their associated manufacturer.
- Linked Specifications: Identify items linked to others within the schedule.
- Supplier: Filter items by their assigned supplier.
- Responsible User: Display only items based on the user responsible for them.
Foreign Editors
The Foreign Editor feature in VOLUM3 lets project teams collaborate with external partners, most often manufacturers, directly inside their Interactive Schedules.
Project users can add a Foreign Editor to a schedule by clicking on IS properties and going to the Foreign Editor tab. This sends the external partner a copy of the table containing the positions and specification descriptions requested by the project team, but without any products pre-filled.
The Foreign Editor then fills these positions with their own product specifications, creating a clear, structured offer. Project users can see the completed entries and easily compare specifications from different manufacturers side by side within their Interactive Schedules.
Foreign Edtors can see all of the Schedules shared with them in the Share With module. Each Foreign Editor only sees their own company’s Interactive Schedule copies and cannot view other external collaborators, ensuring confidentiality and fair comparison.
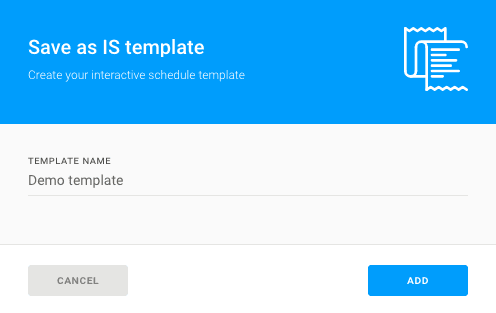
Templates
The Save as Template function in VOLUM3 allows users to save predefined Interactive Schedule structures for later use. Typical schedules include those for FF&E, doors, windows, finishing materials, lighting, and MEP.
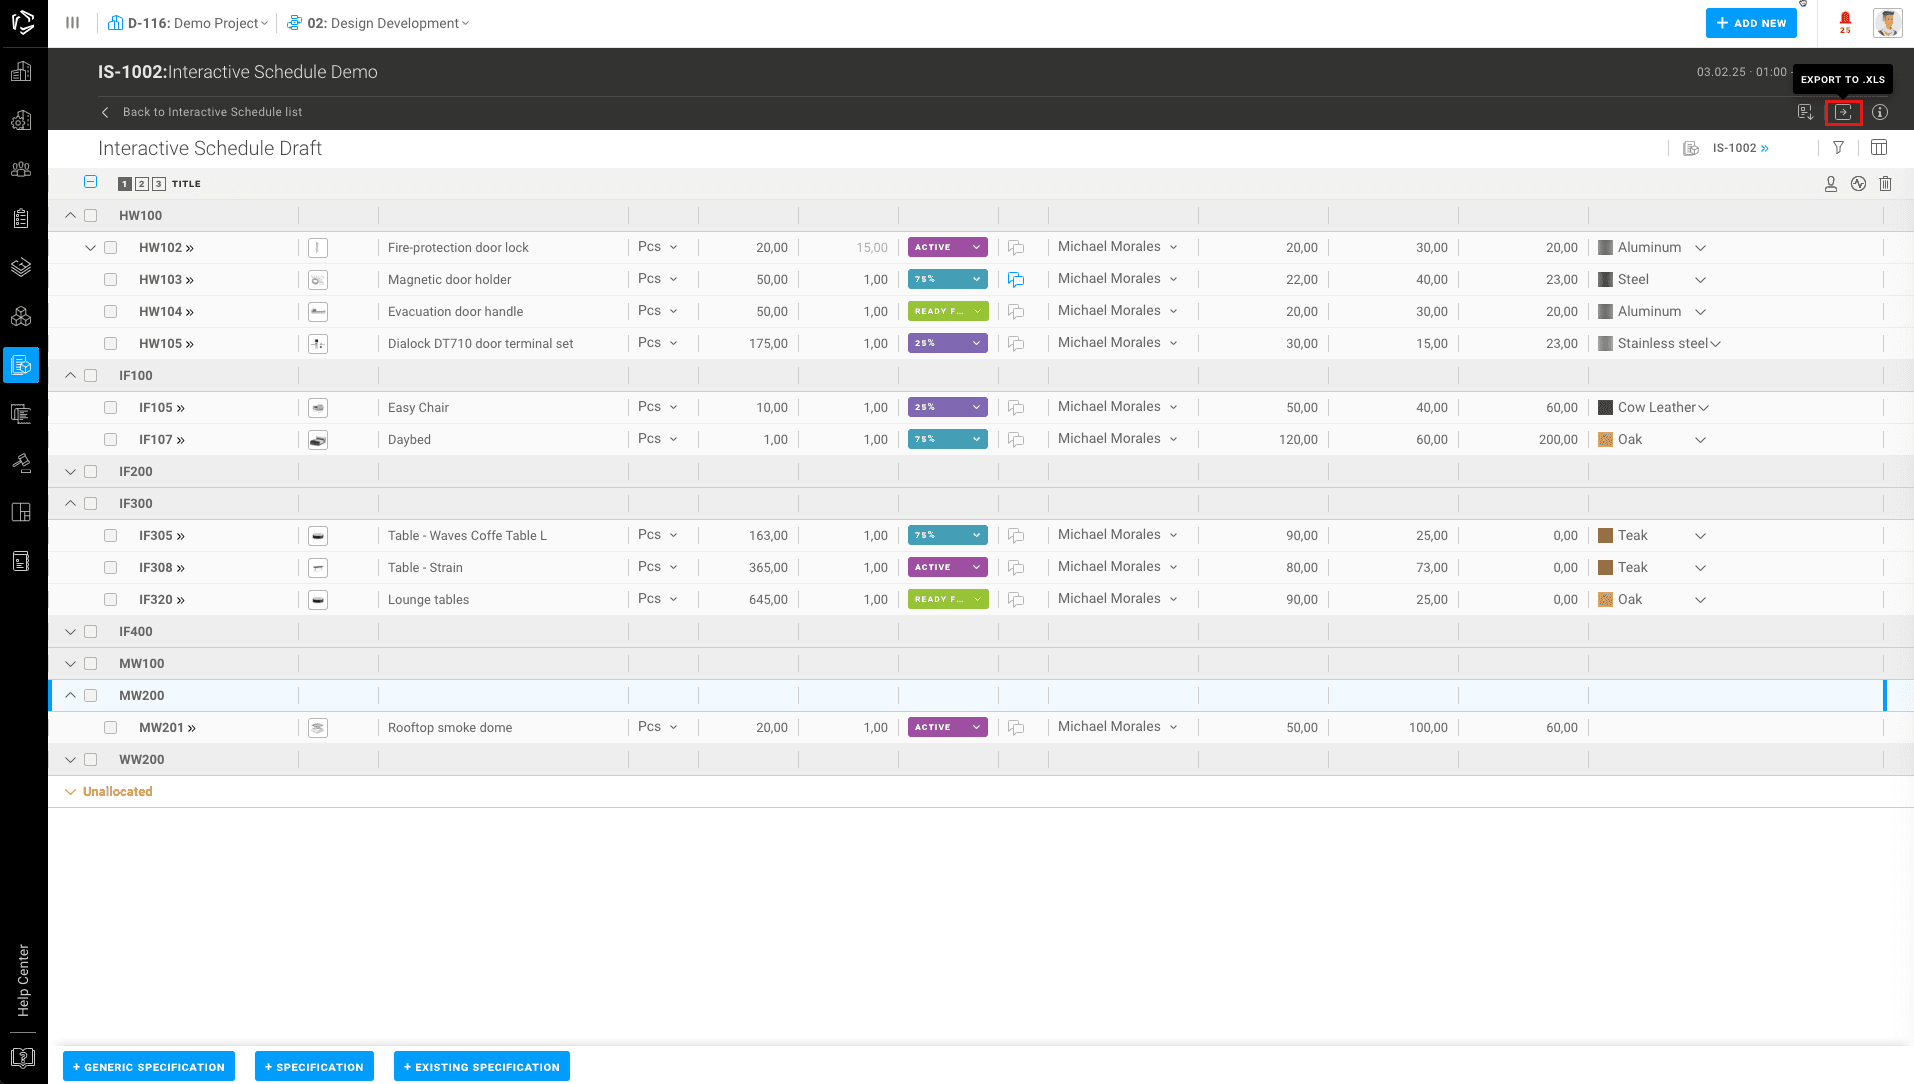
Exporting
The contents of VOLUM3 Interactive schedule can be exported to Spreadsheet XLS so that it can be used in other applications.
In the upper-right corner, click the Export (.XLS) icon to instantly download the table in Excel format.
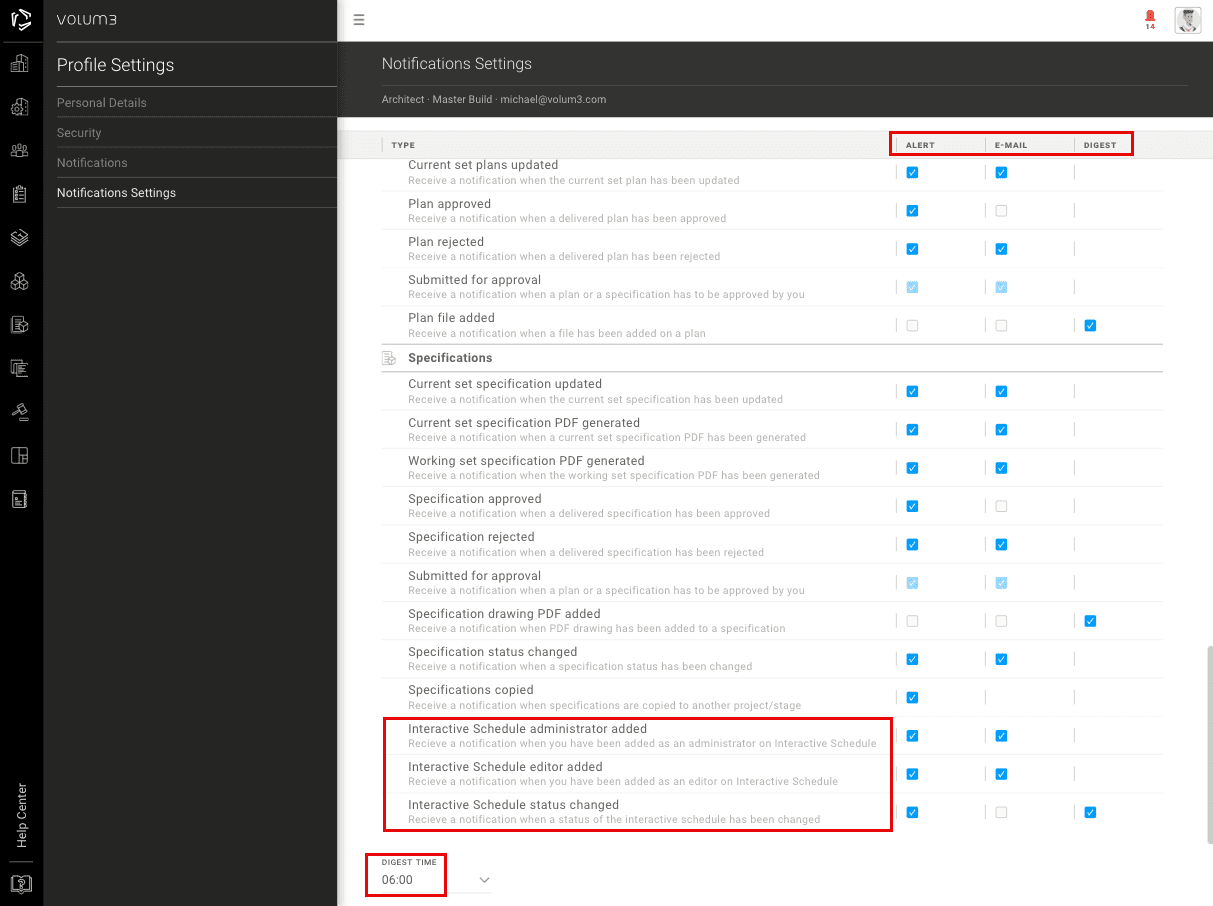
Notifications
You can choose to receive alerts, emails, or digest notifications when there is an update or change to the Interactive schedule.
Interactive schedule administrator added: Receive a notification when you have been added as an administrator in the Interactive schedule.
Interactive Schedule Editor added: Receive a notification when you have been added as an editor in the Interactive schedule.
Interactive schedule status changed: Receive a notification when the status of the interactive schedule has been changed.
Interactive Schedules